Tag: Ubuntu

  • Run a script on boot using systemd on Ubuntu 18.04

    Previous versions of Ubuntu had /etc/rc.local. that get executed after system boot.

    On Ubuntu 18.04, you can use systemd to start a bash script on system boot.

    Create file

    vi /etc/systemd/system/sok-startup.service
    

    Add

    [Unit]
    Description=Start up script
    ConditionPathExists=/etc/rc.local
    
    [Service]
    Type=forking
    ExecStart=/etc/rc.local start
    TimeoutSec=0
    StandardOutput=tty
    RemainAfterExit=yes
    SysVStartPriority=99
    
    [Install]
    WantedBy=multi-user.target
    

    Create file /etc/rc.local with

    #!/bin/bash
    
    touch /root/OK
    
    exit 0
    

    You can replace “touch /root/OK” with whatever command you need to execute.

    Make it executable with

    chmod 755 /etc/rc.local
    

    Reload systemd

    systemctl daemon-reload
    

    Enable the service

    systemctl enable sok-startup.service
    

    Now reboot the server, you will see /root/OK get created.

  • Install AnyDesk on Ubuntu using flatpak

    Install AnyDesk on Ubuntu using flatpak

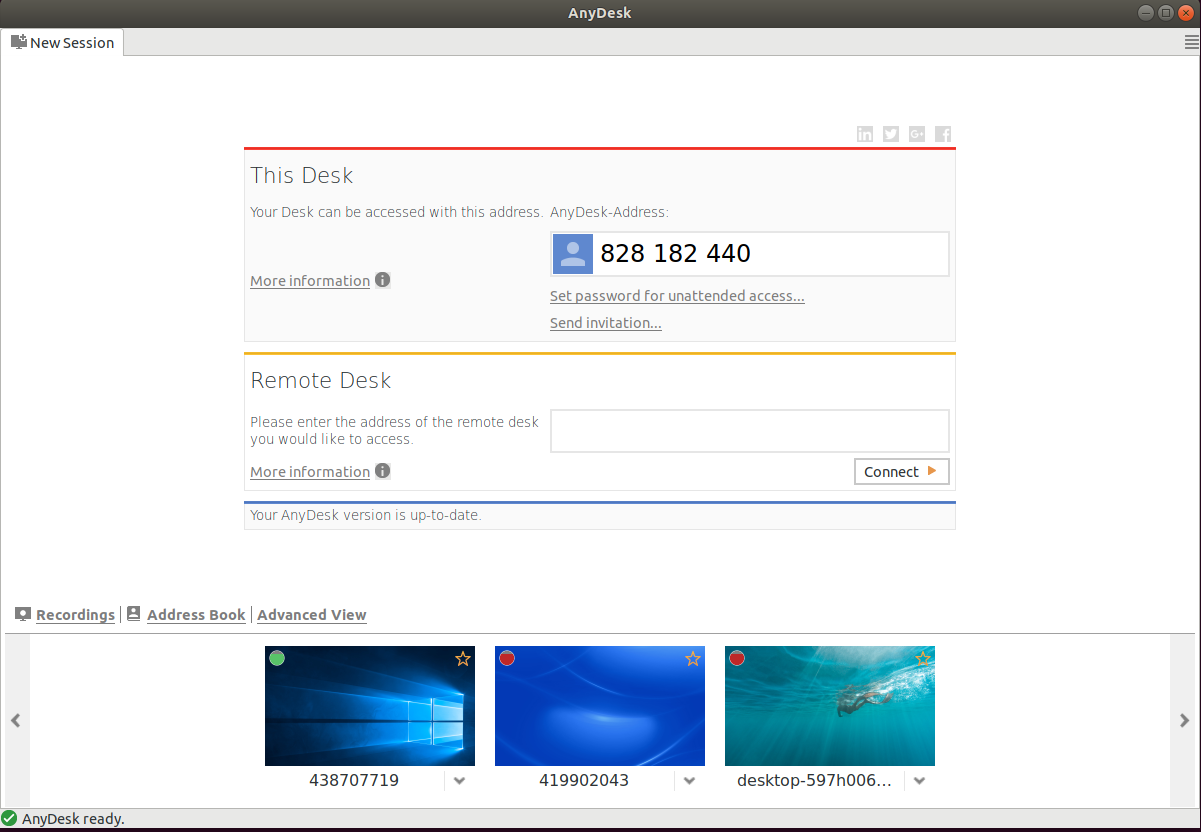
    AnyDesk ubuntu flatpak

    AnyDesk is a remote desktop sharing application like TeamViewer and Google Remote Desktop. I normally use Google Chrome Remote desk as it is completely free. TeamViewer is popuplar alternative, but if they found out you are using it more often, they will limit your session to 5 minutes, some times even less to force you pay for paid version.

    AnyDesk available for Ubuntu in deb file. I don’t like installing .deb package as it run a background process on port 7070 or somthing like that. So i decided to go with flatpak version.

    First install flatpak with command

    sudo apt install flatpak
    

    Add remote

    flatpak remote-add --if-not-exists flathub https://flathub.org/repo/flathub.flatpakrepo
    

    Now you can install AnyDesk with command

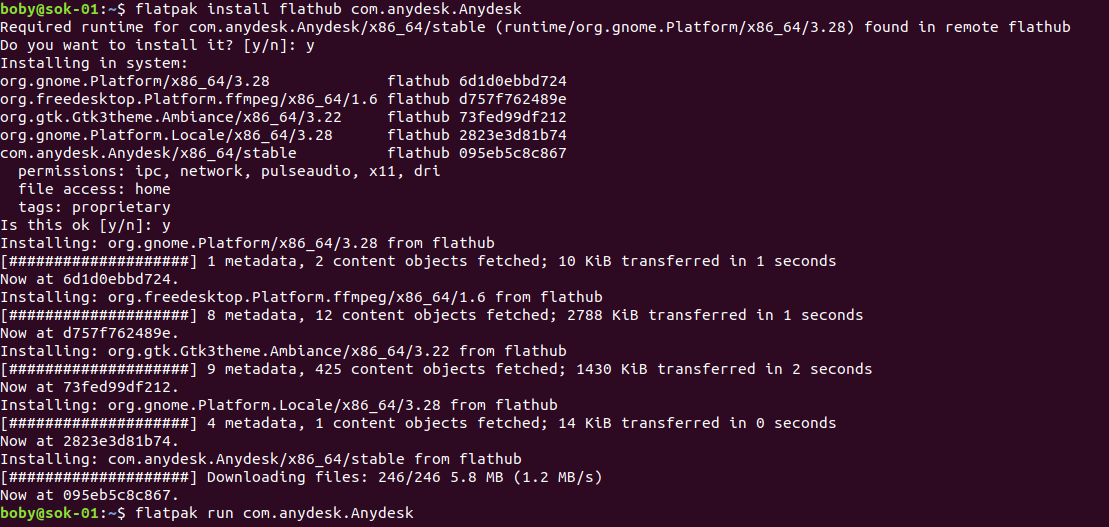
    flatpak install flathub com.anydesk.Anydesk
    

    flatpak install anydesk

    To run AnyDesk, run

    flatpak run com.anydesk.Anydesk
    
  • Configure Failover IP in Ubuntu 18.04 OVH VPS

    Default /etc/network/interfaces in Ubuntu 18.04 in OVH VPS look like following. Click here for Ubuntu 20.04 instructions.

    root@vps624512:~# cat /etc/network/interfaces 
    # ifupdown has been replaced by netplan(5) on this system.  See
    # /etc/netplan for current configuration.
    # To re-enable ifupdown on this system, you can run:
    #    sudo apt install ifupdown
    root@vps624512:~# 
    

    First install

    sudo apt install ifupdown -y
    

    Configure Main IP

    use “ip a” command to find out interface name and IP of the VPS

    root@vps624512:~# ip a
    1: lo:  mtu 65536 qdisc noqueue state UNKNOWN group default qlen 1000
        link/loopback 00:00:00:00:00:00 brd 00:00:00:00:00:00
        inet 127.0.0.1/8 scope host lo
           valid_lft forever preferred_lft forever
        inet6 ::1/128 scope host 
           valid_lft forever preferred_lft forever
    2: ens3:  mtu 1500 qdisc fq_codel state UP group default qlen 1000
        link/ether fa:16:3e:f4:1e:fd brd ff:ff:ff:ff:ff:ff
        inet 51.77.149.182/32 scope global dynamic ens3
           valid_lft 49349sec preferred_lft 49349sec
        inet6 fe80::f816:3eff:fef4:1efd/64 scope link 
           valid_lft forever preferred_lft forever
    root@vps624512:~#
    

    In this case,

    IP = 51.77.149.182
    Interface Name = ens3

    Use “route -n” command to find out gateway.

    root@vps624512:~# route -n
    Kernel IP routing table
    Destination     Gateway         Genmask         Flags Metric Ref    Use Iface
    0.0.0.0         51.77.148.1     0.0.0.0         UG    100    0        0 ens3
    51.77.148.1     0.0.0.0         255.255.255.255 UH    100    0        0 ens3
    root@vps624512:~# 
    

    GATEWAY = 51.77.148.1

    Edit /etc/network/interfaces

    vi /etc/network/interfaces
    

    Add following

    auto INTERFACE_NAME
    iface INTERFACE_NAME inet static
        address SEVER_MAIN_IP
        netmask 255.255.255.255
        broadcast SEVER_MAIN_IP
        dns-nameservers 8.8.8.8 1.1.1.1
        post-up route add GATEWAY_IP dev INTERFACE_NAME
        post-up route add default gw GATEWAY_IP
        post-down route del default gw GATEWAY_IP
        post-down route del GATEWAY_IP dev INTERFACE_NAME
    

    In the above, replace INTERFACE_NAME, SEVER_MAIN_IP and GATEWAY_IP.

    For this server, i added.

    auto ens3
    iface ens3 inet static
        address 51.77.149.182
        netmask 255.255.255.255
        broadcast 51.77.149.182
        post-up route add 51.77.148.1 dev ens3
        post-up route add default gw 51.77.148.1
        post-down route del default gw 51.77.148.1
        post-down route del 51.77.148.1 dev ens3
    

    Now reboot the server.

    Once server is back online, you can configure failover IPS.

    Configure Failover IP

    Use following script to generate your config, add in end of /etc/network/inferfaces file

    php script to generate ip config

    Once configured, you need to reboot the servr.

    Verify IP is up with fping command.

    fping
    /etc/inetnet/interfaces

  • Ubuntu Slow Boot

    Ubuntu Slow Boot

    Last day my PC become very slow to boot.

    boby@ok-pc-01:~$ systemd-analyze 
    Startup finished in 15.777s (kernel) + 3min 1.400s (userspace) = 3min 17.178s
    graphical.target reached after 1min 47.169s in userspace
    boby@ok-pc-01:~$ 
    

    It take 3 minutes and 17 seconds to boot up.

    This happend after i did some changes to my 2nd hard disk and added ZFS partition. First thing i thought it was ZFS that make my PC slow.

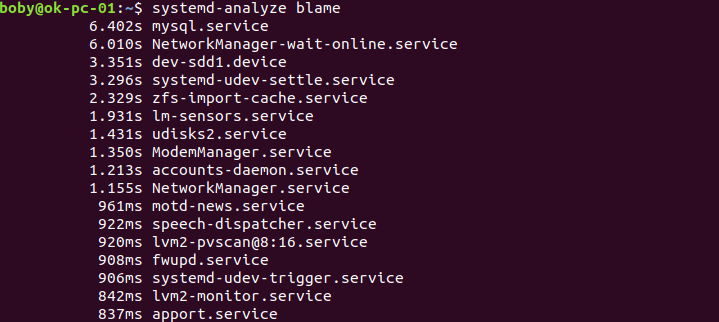
    systemd-analyze blame did not show any useful info.

    systemd-analyze blame
    

    systemd analyze blame

    To find the problem, i edited the file

    sudo  vi /etc/defaults/grub
    

    Find the line

    GRUB_CMDLINE_LINUX_DEFAULT="quiet splash"
    

    Replace it with

    GRUB_CMDLINE_LINUX_DEFAULT=""
    

    Now rebuild grub.cfg with

    update-grub2
    

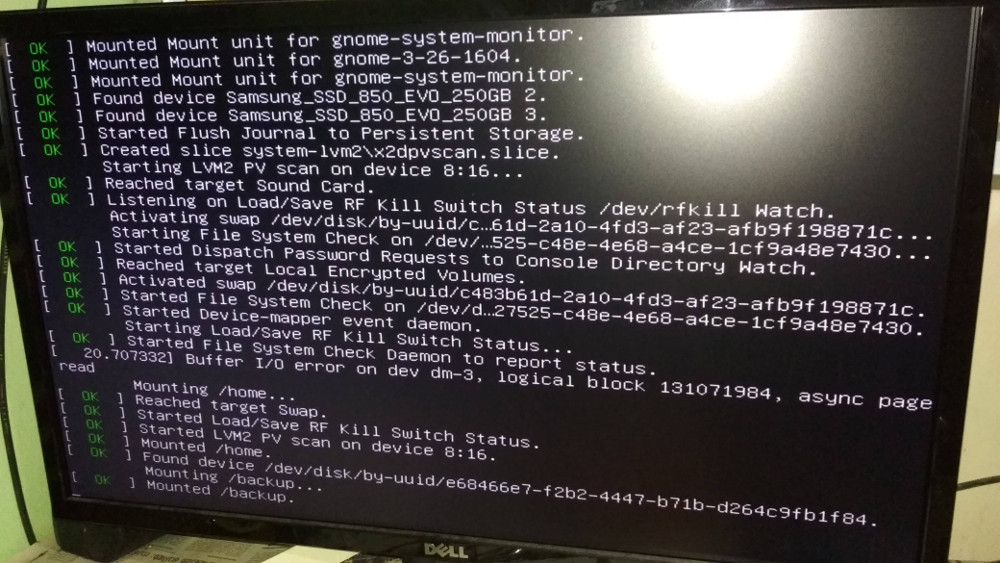
    Rebooted the PC. Now instead of showing Ubuntu splash screen, you get lot of text, that shows what actually your PC is doing.

    Ubuntu Grub Disable Splash

    From the boot message i found system waiting 1 minutes 30 seconds for mounting one of the disk partition. This is because i re-partitioned my 2nd hard disk and forget to remove the disk from /etc/fstab.

    I removed the non existant disk entry from /etc/fstab and rebooted PC. Now it boot much faster.

    systemd analyze

    See Ubuntu

  • Enable Native Notification in Google Chrome

    Enable Native Notification in Google Chrome

    UPDATE: Google Chrome have this option removed now. But you still can manually enable it by editing config file. See Disable Native Notification on Google Chrome Ubuntu

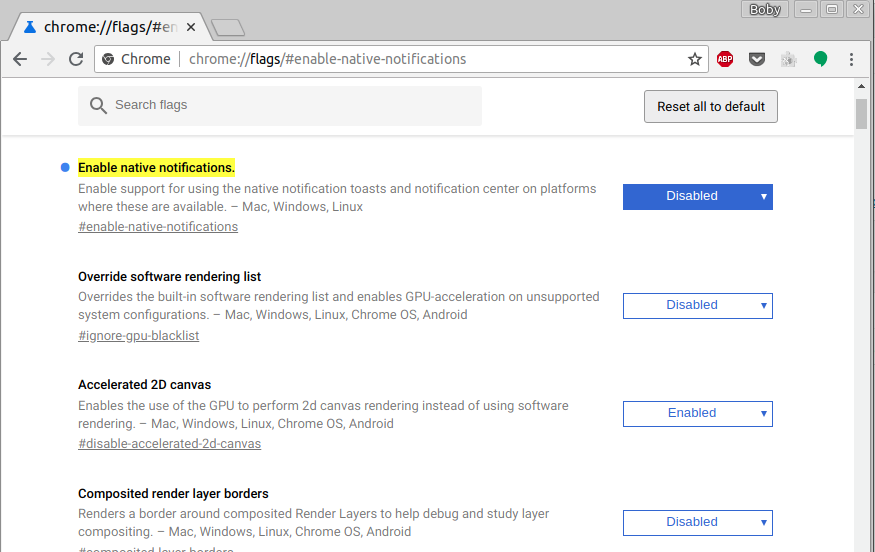
    To enable/disable native notification in Google chrome, go to

    chrome://flags/#enable-native-notifications
    

    Google Chrome Native Notification

    Once native notification is enabled/disabled, you will be asked to restart browser.

    On Ubuntu 18.04, i disable Native Notification as it is buggy, come can’t control how long notification shown if you use native notification. With chrome provided notification, you can use javascript to disable notification after predefined time. On Ubuntu 16.04, native notification is disabled by default.

    Chrome

  • Install x2Go Client in Ubuntu

    x2go client is available in Ubuntu repoitory. To install, run

    apt install x2goclient
    

    Here are some useful shortcuts

    • Ctrl + Alt + F = Switch between full screen and window mode
    • Ctrl + Alt + arrow keys = change view port.

    x2go

  • OVH VPS Configure failover IP in Ubuntu

    On Ubuntu

    Default config look like

    root@zecurecode:~# cat /etc/network/interfaces
    # This file describes the network interfaces available on your system
    # and how to activate them. For more information, see interfaces(5).
    
    # The loopback network interface
    auto lo
    iface lo inet loopback
    
    # Source interfaces
    # Please check /etc/network/interfaces.d before changing this file
    # as interfaces may have been defined in /etc/network/interfaces.d
    # See LP: #1262951
    source /etc/network/interfaces.d/*.cfg
    
    root@zecurecode:~#
    

    /etc/network/interfaces.d/50-cloud-init.cfg is used to auto configure network interface with dhcp.

    root@zecurecode:~# cat /etc/network/interfaces.d/50-cloud-init.cfg 
    # This file is generated from information provided by
    # the datasource.  Changes to it will not persist across an instance.
    # To disable cloud-init's network configuration capabilities, write a file
    # /etc/cloud/cloud.cfg.d/99-disable-network-config.cfg with the following:
    # network: {config: disabled}
    auto lo
    iface lo inet loopback
    
    auto ens3
    iface ens3 inet dhcp
    root@zecurecode:~# 
    

    First find the gateway used by the VPS.

    root@zecurecode:~# route -n
    Kernel IP routing table
    Destination     Gateway         Genmask         Flags Metric Ref    Use Iface
    0.0.0.0         51.254.32.1     0.0.0.0         UG    0      0        0 ens3
    51.254.32.1     0.0.0.0         255.255.255.255 UH    0      0        0 ens3
    root@zecurecode:~# 
    

    We found the gateway IP 51.254.32.1

    The VPS had main IP of the server is 51.254.35.58 and secondary IPS 94.23.153.137, 178.32.52.159, 178.32.49.157

    Here is the modified /etc/network/interfaces

    root@zecurecode:~# cat /etc/network/interfaces
    # This file describes the network interfaces available on your system
    # and how to activate them. For more information, see interfaces(5).
    
    # The loopback network interface
    auto lo
    iface lo inet loopback
    
    # Source interfaces
    # Please check /etc/network/interfaces.d before changing this file
    # as interfaces may have been defined in /etc/network/interfaces.d
    # See LP: #1262951
    #source /etc/network/interfaces.d/*.cfg
    
    auto ens3
    iface ens3 inet static
        address 51.254.35.58
        netmask 255.255.255.255
        broadcast 51.254.35.58
        post-up route add 51.254.32.1 dev ens3
        post-up route add default gw 51.254.32.1
        post-down route del default gw 51.254.32.1
        post-down route del 51.254.32.1 dev ens3
    
    auto ens3:1
    iface ens3:1 inet static
        address 94.23.153.137
        netmask 255.255.255.255
        broadcast 94.23.153.137
    
    auto ens3:2
    iface ens3:2 inet static
        address 178.32.52.159
        netmask 255.255.255.255
        broadcast 178.32.52.159
    
    auto ens3:3
    iface ens3:3 inet static
        address 178.32.49.157
        netmask 255.255.255.255
        broadcast 178.32.49.157
    
    
    root@zecurecode:~# 
    

    Here is a PHP script to create OVH failover IP config for Ubuntu/Debian.

    https://gist.github.com/serverok/991f7ccd1be36cbc579e8d55caf39715

  • getting huawei e8231 work on ubuntu 14.04

    After connecting, i get following in lsusb

    root@fwhlin:~ # lsusb | grep 12d1
    Bus 009 Device 004: ID 12d1:1f01 Huawei Technologies Co., Ltd. E353/E3131 (Mass storage mode)
    root@fwhlin:~ # 
    

    It says “Mass storage mode”. If you check demesg, you will see

    [ 2385.775523] usb 9-2: New USB device found, idVendor=12d1, idProduct=1f01
    [ 2385.775527] usb 9-2: New USB device strings: Mfr=1, Product=2, SerialNumber=3
    [ 2385.775529] usb 9-2: Product: HUAWEI Mobile
    [ 2385.775531] usb 9-2: Manufacturer: HUAWEI
    [ 2385.775532] usb 9-2: SerialNumber: FFFFFFFFFFFFFFFF
    [ 2385.837882] usb-storage 9-2:1.0: USB Mass Storage device detected
    [ 2385.838108] scsi15 : usb-storage 9-2:1.0
    [ 2386.858462] scsi 15:0:0:0: CD-ROM            HUAWEI   Mass Storage     2.31 PQ: 0 ANSI: 2
    [ 2386.859826] sr1: scsi-1 drive
    [ 2386.859946] sr 15:0:0:0: Attached scsi CD-ROM sr1
    

    Last line says, device mounted as “/dev/sr1”

    root@fwhlin:~ # df -h | grep sr
    /dev/sr1        4.3M  4.3M     0 100% /media/boby/MobileWiFi
    root@fwhlin:~ # 
    

    Changing Device Mode to Modem

    I found some information about the device in file

    sudo -s
    cd /usr/share/usb_modeswitch
    tar zxvf configPack.tar.gz
    
    root@fwhlin:~ # cat /usr/share/usb_modeswitch/12d1:1f01
    # Huawei E353 (3.se) and others
    TargetVendor=0x12d1
    TargetProductList="14db,14dc"
    MessageContent="55534243123456780000000000000011062000000101000100000000000000"
    NoDriverLoading=1
    root@fwhlin:~ # 
    

    It says device can operate as products “14db” and “14dc”.

    I tried changing device mode to product id 14db, it did not work, so tried 14dc and it worked.

    usb_modeswitch -v 12d1 -p 1f01 -V 12d1 -P 14dc -M "55534243123456780000000000000011062000000101000100000000000000"
    
    root@fwhlin:~ # usb_modeswitch -v 12d1 -p 1f01 -V 12d1 -P 14dc -M "55534243123456780000000000000011062000000101000100000000000000"
    Look for target devices ...
     No devices in target mode or class found
    Look for default devices ...
       product ID matched
     Found devices in default mode (1)
    Access device 002 on bus 009
    Current configuration number is 1
    Use interface number 0
    Use endpoints 0x01 (out) and 0x81 (in)
    
    USB description data (for identification)
    -------------------------
    Manufacturer: HUAWEI
         Product: HUAWEI Mobile
      Serial No.: FFFFFFFFFFFFFFFF
    -------------------------
    Looking for active driver ...
     No active driver found. Detached before or never attached
    Set up interface 0
    Use endpoint 0x01 for message sending ...
    Trying to send message 1 to endpoint 0x01 ...
     OK, message successfully sent
    Reset response endpoint 0x81
    Reset message endpoint 0x01
    -> Run lsusb to note any changes. Bye!
    
    root@fwhlin:~ #
    

    Now “ifconfig” shows usb0.

    root@fwhlin:~ # ifconfig
    ...
    ...
    ...
    usb0      Link encap:Ethernet  HWaddr be:69:7c:b1:a3:b6  
              inet addr:192.168.8.100  Bcast:192.168.8.255  Mask:255.255.255.0
              inet6 addr: fe80::bc69:7cff:feb1:a3b6/64 Scope:Link
              UP BROADCAST RUNNING MULTICAST  MTU:1500  Metric:1
              RX packets:15 errors:0 dropped:0 overruns:0 frame:0
              TX packets:44 errors:0 dropped:0 overruns:0 carrier:0
              collisions:0 txqueuelen:1000 
              RX bytes:6315 (6.3 KB)  TX bytes:8138 (8.1 KB)
    
    root@fwhlin:~ # 
    

    If you check “lsusb”, now device have different product id.

    root@fwhlin:~ # lsusb | grep 12d1
    Bus 009 Device 003: ID 12d1:14dc Huawei Technologies Co., Ltd. 
    root@fwhlin:~ # 
    

    Connecting To Internet

    You will need to disable eth0 or all traffic will be routed through it by default.

    suo ifconfig eth0 down
    
    root@fwhlin:~ # curl http://iptools.bizhat.com/ipv4.php
    59.98.137.87
    root@fwhlin:~ # sudo ifconfig eth0 down
    root@fwhlin:~ # curl http://iptools.bizhat.com/ipv4.php
    106.77.164.191
    root@fwhlin:~ #