Category: Linux

  • OpenLiteSpeed

    OpenLiteSpeed

    OpenLiteSpeed is an open-source version of the popular commercial web server LiteSpeed. OpenLiteSpeed contains all of the essential features found in LiteSpeed Enterprise.

    You can get OpenLiteSpeed from

    https://openlitespeed.org

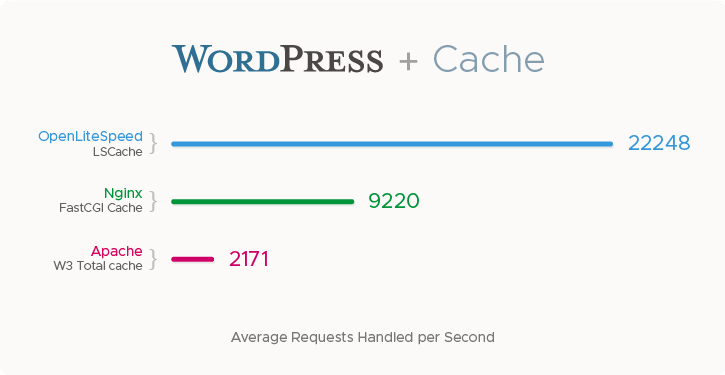
    Here is a benchmark from the OpenLiteSpeed website that compares OpenLiteSpeed with Nginx.

    OpenLiteSpeed Benchmark

    OpenLiteSpeed configuration file

    /usr/local/lsws/conf/httpd_config.conf

    To start/stop/restart, use

    /usr/local/lsws/bin/lswsctrl start
    /usr/local/lsws/bin/lswsctrl stop
    /usr/local/lsws/bin/lswsctrl restart
    /usr/local/lsws/bin/lswsctrl status

    OpenLiteSpeed web server stores cache in directory /usr/local/lsws/cachedata. This can grow big over time. You can delete this folder to free up space or move it to another partition with free disk space and create a symlink.

    To set/reset the WebAdmin password, run

    /usr/local/lsws/admin/misc/admpass.sh

    Update OpenLiteSpeed

    /usr/local/lsws/admin/misc/lsup.sh -v 1.8.1

    You can login to WebAdmin at

    https://server-ip:7080

    Web Server

  • Linux whois command

    Linux whois command is used to find who owns a domain or IP address.

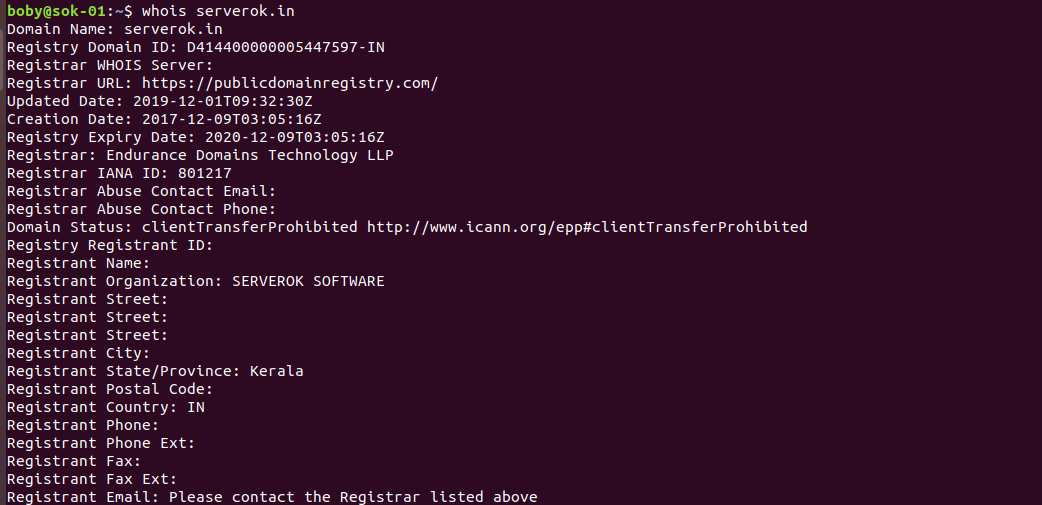
    To see information about a domain, use

    whois DOMAIN_NAME_HERE
    

    Example

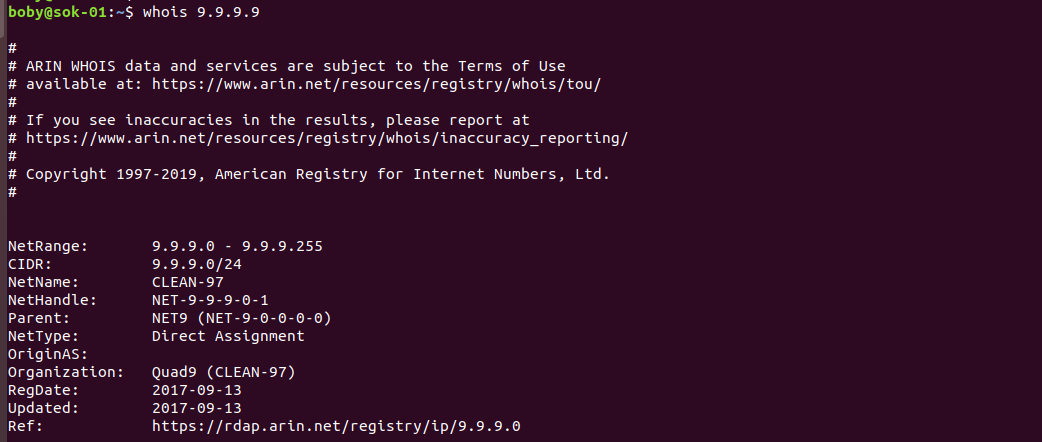
    To find information about an IP address, use

    whois IP_ADDR_HERE
    

    Example

    whois ip address

    Related Posts

    Linux Commands

  • Set hostname in CentOS 7

    Hostname is a sub domain. To set hosting, edit file

    vi /etc/hosts
    

    Add

    SERVER_IP_HERE HOSTNAME.yourdomain.com HOSTNAME
    

    Example

    72.21.51.194 server32.serverok.in server32
    

    Now run

    echo HOSTNAME.yourdomain.com > /etc/hostname
    

    Example

    echo server32.serverok.in > /etc/hostname
    

    Run

    /bin/hostname -F /etc/hostname
    

    Edit file

    vi /etc/sysconfig/network
    

    Edit or add HOSTNAME entry

    NETWORKING=yes
    HOSTNAME=HOSTNAME.yourdomain.com
    

    Reboot the server with

    reboot
    

    You can verify hostname with command

    hostname
    

    Related Posts

    Change Server Hostname in VestaCP
    Set Permanant hostname on AWS EC2 CentOS 7 server
    Install SSL for Cpanel Server Hostname

  • Check if HTTP/2 enabled using curl

    To see if a web site have HTTP/2 enabled, you can run

    curl -sI SITE_URL_HERE -o /dev/null -w '%{http_version}\n'
    

    If you see 2, the site have HTTP/2 enabled.

    Example

    boby@sok-01:~$ curl -sI https://serverok.in/ -o /dev/null -w '%{http_version}\n'
    2
    boby@sok-01:~$ 
    

    Here is a site with no HTTP/2

    boby@sok-01:~$ curl -sI http://ok.serverok.in/ -o /dev/null -w '%{http_version}\n'
    1.1
    boby@sok-01:~$ 
    
  • wget print content to screen

    wget is used to download files. When you use wget to run cronjob, it creates a lot of files. To avoid this, you can use the wget option -qO-

    If you want to use wget, you can use -O option, that speicify file to save. You can use -O /dev/stdout, so downloaded file content will be written to stdout.

    wget -O /dev/stdout http://checkip.amazonaws.com
    

    You can use -q to hide the download progres message (quite).

    wget -q -O /dev/stdout http://checkip.amazonaws.com

    -O /dev/stdout can be replaced with

    -O -

    Or

    -O-

    Example

    wget -qO- http://checkip.amazonaws.com

    See wget

  • CentOS 7 VestaCP Upgrade PHP to 7.x

    On CentOS 7 VestaCP install PHP 5.6 by default. This is very old version of PHP. To upgrade PHP to latest version 7.x, you can install remi repo.

    Install EPEL repo

    yum install -y epel-release
    

    Install yum-utils

    yum install -y yum-utils
    

    Install remi repo

    rpm -ivh http://rpms.remirepo.net/enterprise/remi-release-7.rpm
    

    Select PHP version you need

    yum-config-manager --enable remi-php73
    

    Here i selected PHP 7.3. You can select differnt PHP versions with commands like.

    yum-config-manager --enable remi-php56
    yum-config-manager --enable remi-php71
    yum-config-manager --enable remi-php72
    yum-config-manager --enable remi-php73
    yum-config-manager --enable remi-php74
    

    Make sure you only enable one PHP version. If you enabled a PHP version from remi repo, disable it with

    yum-config-manager --disable remi-php56
    yum-config-manager --disable remi-php70
    yum-config-manager --disable remi-php71
    yum-config-manager --disable remi-php72
    yum-config-manager --disable remi-php73
    yum-config-manager --disable remi-php74
    

    Once you have desired version enabled, run yum upgrade

    yum upgrade
    

    Or only for PHP, run

    yum upgrade php*
    
  • Redirect site from www to non-www

    Redirect site from www to non-www

    It is better to make web site available with one URL. Many sites work with both wwww and non-www (naked domain) urls.

    Using www or non-www is personal choice. One advantage of using wwww for URL is when you have lot of sub domains. If you use non-www url, cookies set by the domain will be available to sub domains. This will increase bandwidth usage as cookie need to be sent with every request browser make to web server.

    Apache

    If you are using Apache web server, you can redirect wwww to non-www URL by adding the following code in the .htaccess file

    RewriteEngine On
    RewriteCond %{HTTP_HOST} ^www.yourdomain.com [NC]
    RewriteRule ^(.*)$ https://yourdomain.com$1 [L,R=301]

    Redirect non-www to www

    RewriteEngine On
    RewriteCond %{HTTP_HOST} ^yourdomain.com [NC]
    RewriteRule ^(.*)$ https://www.yourdomain.com$1 [L,R=301]

    Nginx

    If you use Nginx, it is better to create a server entry for the www URL, and then set a redirect

    server {
        server_name www.yourdomain.com;
        return 301 $scheme://yourdomain.com$request_uri;
    }

    If you want to use the same server entry for www and non-www, add the following code to the nginx server entry for the website.

    Redirect www domain to non-www

    if ( $host != 'yourdomain.com' ) {
        return 301 https://yourdomain.com$request_uri;
    }

    If you use custom ports, use

    if ( $host != 'yourdomain.com' ) {
        return 301 https://yourdomain.com:$server_port$request_uri;
    }

    Redirect Naked Domain to www

    if ( $host != 'www.serverok.in' ) {
        return 301 https://serverok.in$request_uri;
    }

    Related Posts

    Redirect

    htaccess

  • Squid Proxy Server allow connection to all ports

    By default Squid proxy only allow out going connection to white listed ports that are used commonly. When you visit a site with non standard ports with Squid proxy, it won’t work. To fix this, edit squid configuration file

    vi /etc/squid/squid.conf
    

    Find

    acl SSL_ports port 443
    acl Safe_ports port 80          # http
    acl Safe_ports port 21          # ftp
    acl Safe_ports port 443         # https
    acl Safe_ports port 70          # gopher
    acl Safe_ports port 210         # wais
    acl Safe_ports port 1025-65535  # unregistered ports
    acl Safe_ports port 280         # http-mgmt
    acl Safe_ports port 488         # gss-http
    acl Safe_ports port 591         # filemaker
    acl Safe_ports port 777         # multiling http
    

    Replace with

    acl SSL_ports port 1-65535
    acl Safe_ports port 1-65535
    

    Restart squid with

    systemctl restart squid
    

    Related Posts

    Install Squid Proxy Server

    proxy

  • Install Elasticsearch 6 on Debian for Magento

    To install Elasticsearch for Magento on Debian, install Java 1.8 and apt-transport-https

    apt install -y openjdk-8-jdk-headless
    apt install -y apt-transport-https
    

    Add key

    wget -qO - https://artifacts.elastic.co/GPG-KEY-elasticsearch | apt-key add -
    

    Add repository

    echo "deb https://artifacts.elastic.co/packages/6.x/apt stable main" | tee -a /etc/apt/sources.list.d/elastic-6.x.list
    

    Install Elasticsearch

    apt update
    apt install -y elasticsearch
    

    Enable and start Elasticsearch

    systemctl enable elasticsearch
    systemctl restart elasticsearch
    
  • CentOS 7 Grub 2

    CentOS 7 Grub 2

    To regenerate grub config on CentOS 7, run

    grub2-mkconfig -o /boot/grub2/grub.cfg
    

    If you use UEFI, run

    grub2-mkconfig -o /boot/efi/EFI/centos/grub.cfg
    

    OVH CentOS 7 server grub rescue prompt

    Back to grub

  • How to reinstall packages using yum

    How to reinstall packages using yum

    To reinstall a package with yum, run

    yum reinstall PKG_NAME
    

    Example

    yum reinstall kernel