Category: Linux

  • Install ionCube Loader on CentOS 7

    Go to

    https://www.ioncube.com/loaders.php

    Download latest version of ionCube Loader

    cd /usr/local/src
    wget https://downloads.ioncube.com/loader_downloads/ioncube_loaders_lin_x86-64.tar.gz
    tar xvf ioncube_loaders_lin_x86-64.tar.gz
    cd ioncube
    

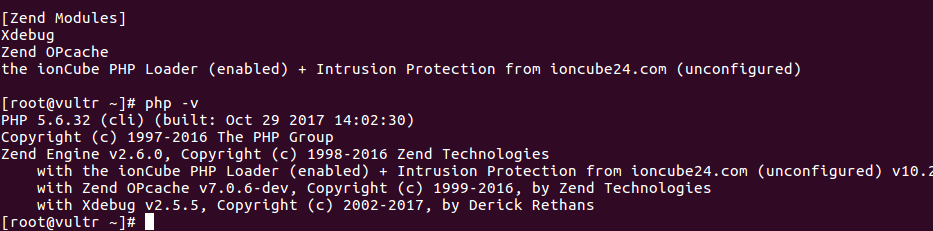
    Find out PHP version you are using with command

    php -v
    

    ioncube php version

    Here we have PHP version 5.6, now you need to find the available loaders for PHP 5.6 with command

    ls -l | grep 5.6
    

    The one we needed is ioncube_loader_lin_5.6.so

    You need to copy it to PHP extension_dir directory.

    To find location of extension_dir, run

    php -i | grep extension_dir
    

    For default php installation, it will be /usr/lib64/php/modules

    So copy it the loader with command

    cp ioncube_loader_lin_5.6.so /usr/lib64/php/modules
    

    Edit php.ini

    vi /etc/php.ini
    

    Add

    zend_extension = ioncube_loader_lin_5.6.so
    

    At this point, php -m will show ionCube loader.

    ioncube php module

    Now restart web server with

    service httpd restart
    

    ioncube

  • git log

    To see got commit log, type

    git log
    

    To see logs in one line, run

    git log --oneline
    

    To see one line grap, use

    git log --oneline --graph
    

    or

    git log --oneline --graph --decorate
    

    git

  • xrdp

    xrdp allow you to connect to Linux Desktop using Windows Remote Desktop.

    First you need to install desktop environment. Installing something light weight like XFCE is better if you are using a remote server.

    apt-get install xfce4
    

    This will download approx 500 MB of files and install on Ubuntu 16.04.

    Next install xrdp

    apt-get install xrdp
    

    You need to open port 3389 in firewall.

    Some of the configuration files are

    /etc/default/xrdp
    /etc/xrdp/startwm.sh
    /etc/xrdp/xrdp.ini
    
  • useradd

    To create a user, run

    useradd -m -s /bin/bash USERNAME

    -m = create home directory.
    -s = specify location of shell.

    To create a user with custom home directory, use

    useradd -d /var/www -s /bin/bash USERNAME

    Create user with sudo privileges

    useradd ubuntu --comment Ubuntu --groups adm,cdrom,dip,sudo --shell /bin/bash -m

    Create User with Specific User id

    Create the user “serverok” with uid 4223, run

    useradd -u 4223 serverok

    Create User to Run System Service

    -r option select gid/uid for running system service.

    groupadd -r prometheus
    useradd -r -g prometheus -s /sbin/nologin -d /usr/hostonnet/prometheus/ -c "prometheus Daemons" prometheus

    Related commands

    Create, delete, and modify local user accounts

    Add: useradd
    Delete: userdel
    Modify: usermod

    Create, delete and modify local groups and group memberships

    Add: groupadd
    Delete: groupdel
    Modify: groupmod

    To add a user to sudo/wheel group, see usermod

  • rpaf

    mod_rpaf is an apache module that translate proxy IP to real IP when apache web server is behind a proxy server.

    https://github.com/gnif/mod_rpaf/

    To install on Ubuntu, run

    apt install -y libapache2-mod-rpaf
    

    Config file available at

    root@vps528168:~# cat /etc/apache2/mods-enabled/rpaf.conf
        RPAFenable On
    
        # When enabled, take the incoming X-Host header and
        # update the virtualhost settings accordingly:
        RPAFsethostname On
    
        # Define which IP's are your frontend proxies that sends
        # the correct X-Forwarded-For headers:
        RPAFproxy_ips 127.0.0.1 ::1 193.70.86.5
    
        # Change the header name to parse from the default
        # X-Forwarded-For to something of your choice:
        RPAFheader X-Real-IP
    root@vps528168:~# 
    

    Apache

  • Install pureftpd on Ubuntu

    To install pure-ftpd on Ubuntu, run

    apt install pure-ftpd -y
    

    Create a system user

    useradd -d /var/www -s /bin/bash USERNAME
    chown -R USERNAME:USERNAME /var/www
    passwd USERNAME
    

    Enable Unix Authentication

    To allow system user to login using FTP, edit file

    vi /etc/pure-ftpd/pure-ftpd.conf
    

    Uncomment the line

    UnixAuthentication           yes
    

    Or

    echo 'yes' > /etc/pure-ftpd/conf/UnixAuthentication
    

    On Ubuntu, after default install, you have following settins.

    root@server:/etc/pure-ftpd/auth# ll
    total 8
    drwxr-xr-x 2 root root 4096 Jan 28 05:52 ./
    drwxr-xr-x 5 root root 4096 Jan 28 06:20 ../
    lrwxrwxrwx 1 root root   26 Feb  5  2018 65unix -> ../conf/UnixAuthentication
    lrwxrwxrwx 1 root root   25 Feb  5  2018 70pam -> ../conf/PAMAuthentication
    root@server:~# cat /etc/pure-ftpd/auth/65unix 
    no
    root@server:~# cat /etc/pure-ftpd/auth/70pam 
    yes
    root@server:~# 
    

    PAMAuthentication enabled. UnixAutehticiation disabled. This allow system users to login using PAM.

    pureftpd

  • Pure-FTPd

    To install Pureftpd on CentOS, run

    yum install pure-ftpd
    

    To start/stop, use

    systemctl start pure-ftpd
    systemctl stop pure-ftpd
    

    To enable system users to login, edit /etc/pure-ftpd/pure-ftpd.conf, un comment the line UnixAuthentication yes.

  • Reinstall a package using apt

    To reinstall a package, run

    apt install --reinstall PKG_NAME
    

    Example

    apt reinstall

    dpkg apt

  • dpkg

    To force delete a package, run

    dpkg --purge --force-depends PKG_NAME

    List all Installed packages

    dpkg -l

    List all files in a package

    dpkg -L PKG_NAME

    To find which package provides a file

    dpkg -S /usr/bin/nmap

    Apt

  • File Sharing

    pydio

    Pydio is open source share sharing application. Source code available in github https://github.com/pydio

    https://pydio.com

    https://www.linshare.org

    Scripts

  • Installing Asterisk from Source

    You can download latest source code from

    https://downloads.asterisk.org/pub/telephony/asterisk/

    To install latest 15.x version, run

    cd /usr/local/src
    wget https://downloads.asterisk.org/pub/telephony/asterisk/asterisk-15-current.tar.gz
    tar xvf asterisk-15-current.tar.gz
    cd asterisk-15.2.2
    ./configure
    make && make install
    

    You will need to install dependency.

    Asterisk

  • Installing Asterisk on Ubuntu

    Ubuntu repository provide Asterisk, to install, just run

    apt install asterisk
    

    On Ubuntu 16.04, it come with asterisk 13.1, while newer version is 15.2.

    It is better to install from source if you want latest software.

    Asterisk