Category: General

  • Google Remote Desktop

    Google Remote Desktop

    Google Remove Desktop allow you to connect/share your share your computer with others.

    https://remotedesktop.google.com/

    You need google chrome browser to install Google Remote Desktop. To install go to

    https://remotedesktop.google.com/support

    Click on the download link

    Chrome Remote Desktop Plugin Download

    This will download and install Google Remote Desktop plugin in your computer.

    You can also download Google Chrome Browser plugin directly from

    https://chrome.google.com/webstore/detail/chrome-remote-desktop/gbchcmhmhahfdphkhkmpfmihenigjmpp/

    To access the plugin, open a new Tab in google chrome

    Chrome New Tab

    Click on “App”. On next page, you will have link to start Chrome Remote Desktop.

    Chrome Apps

    Click on “Chrome Remote Desktop”

    Google Chrome Remote Desktop

    To share your computer with others, click on green Share button. If you have not already installed software, you will be asked to install google remote desktop software, then you get a invite code, that you can share with others to give access to your computer.

  • Find Plesk License key

    Find Plesk License key

    To find Plesk serial number on Linux server, run

    grep key-number /etc/sw/keys/keys/key* | grep PLSK | awk -F "<|>" '{print $3}
    

    You can also use

    plesk bin keyinfo --list
    

    But the plesk_key_id you get is in diff format, plesk themself won’t accept this when you submit a support ticket.

    You can also find Plesk License key by logging into Plesk

    Plesk > Tools & Settings > About Plesk

    About Plesk

    On next page you will see

    Plesk License Number

    Plesk

  • Magento 2 CLI

    Create Magento project

    composer create-project --repository=https://repo.magento.com/ magento/project-community-edition=2.4.6 .

    To install Magento 2

    php bin/magento setup:install --base-url=https://yourdomain.com --db-host=localhost --db-name=magento --db-user=root --db-password=MYSQL_ROOT_PW_HERE --admin-firstname=Yujin --admin-lastname=Boby [email protected] --admin-user=OkAdmin --admin-password=ADMIN_PW_HERE --language=en_US --currency=USD --timezone=America/Chicago --use-rewrites=1 --backend-frontname="admin" --search-engine=elasticsearch7

    To create an Admin user, run

    php bin/magento admin:user:create --admin-user="serverok" --admin-firstname="Server" --admin-lastname="Ok" --admin-email="[email protected]" --admin-password="secUre@1919"

    Maintenance mode

    php -d memory_limit=-1 bin/magento maintenance:enable

    Check Maintenance mode status

    php -d memory_limit=-1 bin/magento maintenance:status

    To allow IP in maintance mode

    php -d memory_limit=-1 bin/magento maintenance:allow-ips 117.247.196.198 112.133.248.2

    Flush Magento cache

    php bin/magento cache:flush

    Deploy static content

    php -d memory_limit=-1 bin/magento setup:static-content:deploy
    php -dmemory_limit=6G  bin/magento setup:static-content:deploy -f de_DE en_US it_IT fr_FR

    Change admin login path

    php bin/magento setup:config:set --backend-frontname="admin_path"

    Show Magento configuration. The second command shows the configuration related elastic search

    php bin/magento config:show
    php bin/magento config:show | grep 'elastic'

    See Magento 2

  • Online Image Editing Tools

    EZGIF

    EzGif is an Online GIF maker and image editor.

    https://ezgif.com

  • Reset Prestashop admin password

    Reset Prestashop admin password

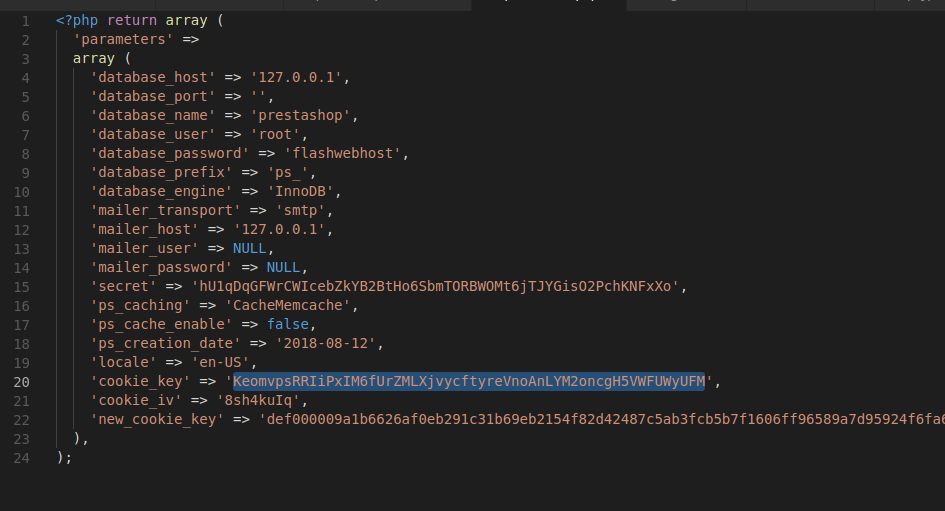
    On Prestashop 1.7, open file

    app/config/parameters.php

    Find the value of “cookie_key”.

    prestashop reset admin password

    Find admin user with the command

    select * from ps_employee;

    This list all employee accounts. Find the email of the user you need to reset password

    Now run the following SQL

    update ps_employee set passwd=MD5("<cooie_key><NEW_PASSORD>") where email="[email protected]";

    Here <cooie_key><NEW_PASSORD> is the combination of cookie_key and your new password. If your cookie key is ttVfw3V5mL7zJBk5QozFjuunN6u4wAkBcgydLFHd4d5hRzPpKjOb4Ohk and you need to reset your password to 2v1PSXa5MO6txmLd, use following command:

    Example

    update ps_employee set passwd=MD5("ttVfw3V5mL7zJBk5QozFjuunN6u4wAkBcgydLFHd4d5hRzPpKjOb4Ohk2v1PSXa5MO6txmLd") where email="[email protected]";

    This set the password for the admin user “[email protected]” to “2v1PSXa5MO6txmLd”.

    See Prestashop

  • PrestaShop Change Database Name

    To change database name, user name and password on PrestaShop 1.7 or later, edit file

    ./app/config/parameters.php
    

    Once this is done, you need to login to PrestaShop backend and clear cache.

    How to Clear Cache in PrestaShop

    For older versions, edit

    config/settings.inc.php
    

    See PrestaShop

  • Prestashop Change URL

    To change the domain name of a Prestashop site, you need to edit the MYSQL database.

    Table ps_configuration

    Value for following should be changed to new domain.

    PS_SHOP_DOMAIN
    PS_SHOP_DOMAIN_SSL

    Table ps_shop_url

    Change the “domain” and “domain_ssl” value.

    Changing Installation Folder

    If you changing the Prestashop installation folder, then you need to change “physical_uri” to the new path. If it is on root directory, use /

    Here are SQL commands to change the URL of PrestaShop to “prestashop.test”

    select * from ps_configuration where name="PS_SHOP_DOMAIN";
    select * from ps_configuration where name="PS_SHOP_DOMAIN_SSL";
    select * from ps_shop_url;
    
    update ps_configuration set value="prestashop.test" where name="PS_SHOP_DOMAIN";
    update ps_configuration set value="prestashop.test" where name="PS_SHOP_DOMAIN_SSL";
    update ps_shop_url set domain="prestashop.test", domain_ssl="prestashop.test" where id_shop_url=1;

    Clear Cache

    Delete var/cache folder.

    rm -rf var/cache

    If Product images not showing after site migration, check PrestaShop Product Images not showing

    See PrestaShop

  • Getting Started with MongoDB

    After MongoDB is installed, you can start MongoDB client with command.

    mongo
    

    List All Databases

    To see list of all available database, use

    show dbs
    

    Create A Database

    To create a database, run

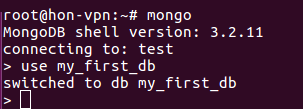
    use DB_NAME
    

    This will create a new database if not present and switch to it.

    See all Collections

    Once you switched to a database using “use DB_NAME” command, you can see collections (or tables) in a database with command

    show collections
    

    Creating Tables

    In MongoDB, tables are called Collections. To create a collection, use

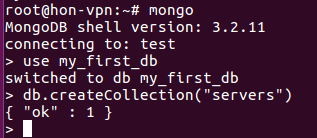
    db.createCollection("COLLECTION_NAME")
    

    Here i create a collection with name “servers”.

    Inserting Data into a Collection

    You can insert data into a collection in Jason format. To insert use following format

    db.COLLECTION_NAME.insert(JSON_DATA)
    

    Example

    db.servers.insert({hostname: "server22.hosthat.com", ip: "144.217.71.213", os: "CloudLinux 7.4", ram: "64G", cpu: "Intel(R) Xeon(R) CPU D-1521 @ 2.40GHz"})
    

    When you insert data MongoDB will auto create a unique “_id” field.

    Listing Data in Collection

    To list all available data in a collection, use

    db.COLLECTION_NAME.find()
    

    This will list all data. To list specific data, you can pass JSON string to find(), for example, to find all servers to 64G RAM, use

    db.servers.find({ram: "64G"})
    

    MongoDB

  • DNS Resolver

    CloudFlare announced privacy-first consumer DNS service.

    IP of CloudFlare public DNS servers are

    1.1.1.1
    1.0.0.1
    

    So far i was using Google Public DNS servers as my resolver.

    8.8.8.8
    8.8.4.4
    

    Quad9

    Quad9 is from IMB and Global Cyber Allience.

    https://www.quad9.net

    9.9.9.9
    

    Other public DNS server is OpenDNS

    208.67.222.222
    208.67.220.220
    

    All these DNS servers have good connectivity in india. I get ~65 ping to these serves, that is normal for indian servers.

    On linux you can configure DNS server by editing file

    vi /etc/resolv.conf
    

    Add

    nameserver 1.1.1.1
    nameserver 8.8.8.8
    nameserver 9.9.9.9
    
  • RailWire 2018 FTTH BroadBand Plans

    RailWire, Government of india owned ISP that provide FTTH connection through Cable TV operators have come up with new boardband plans for 2018.

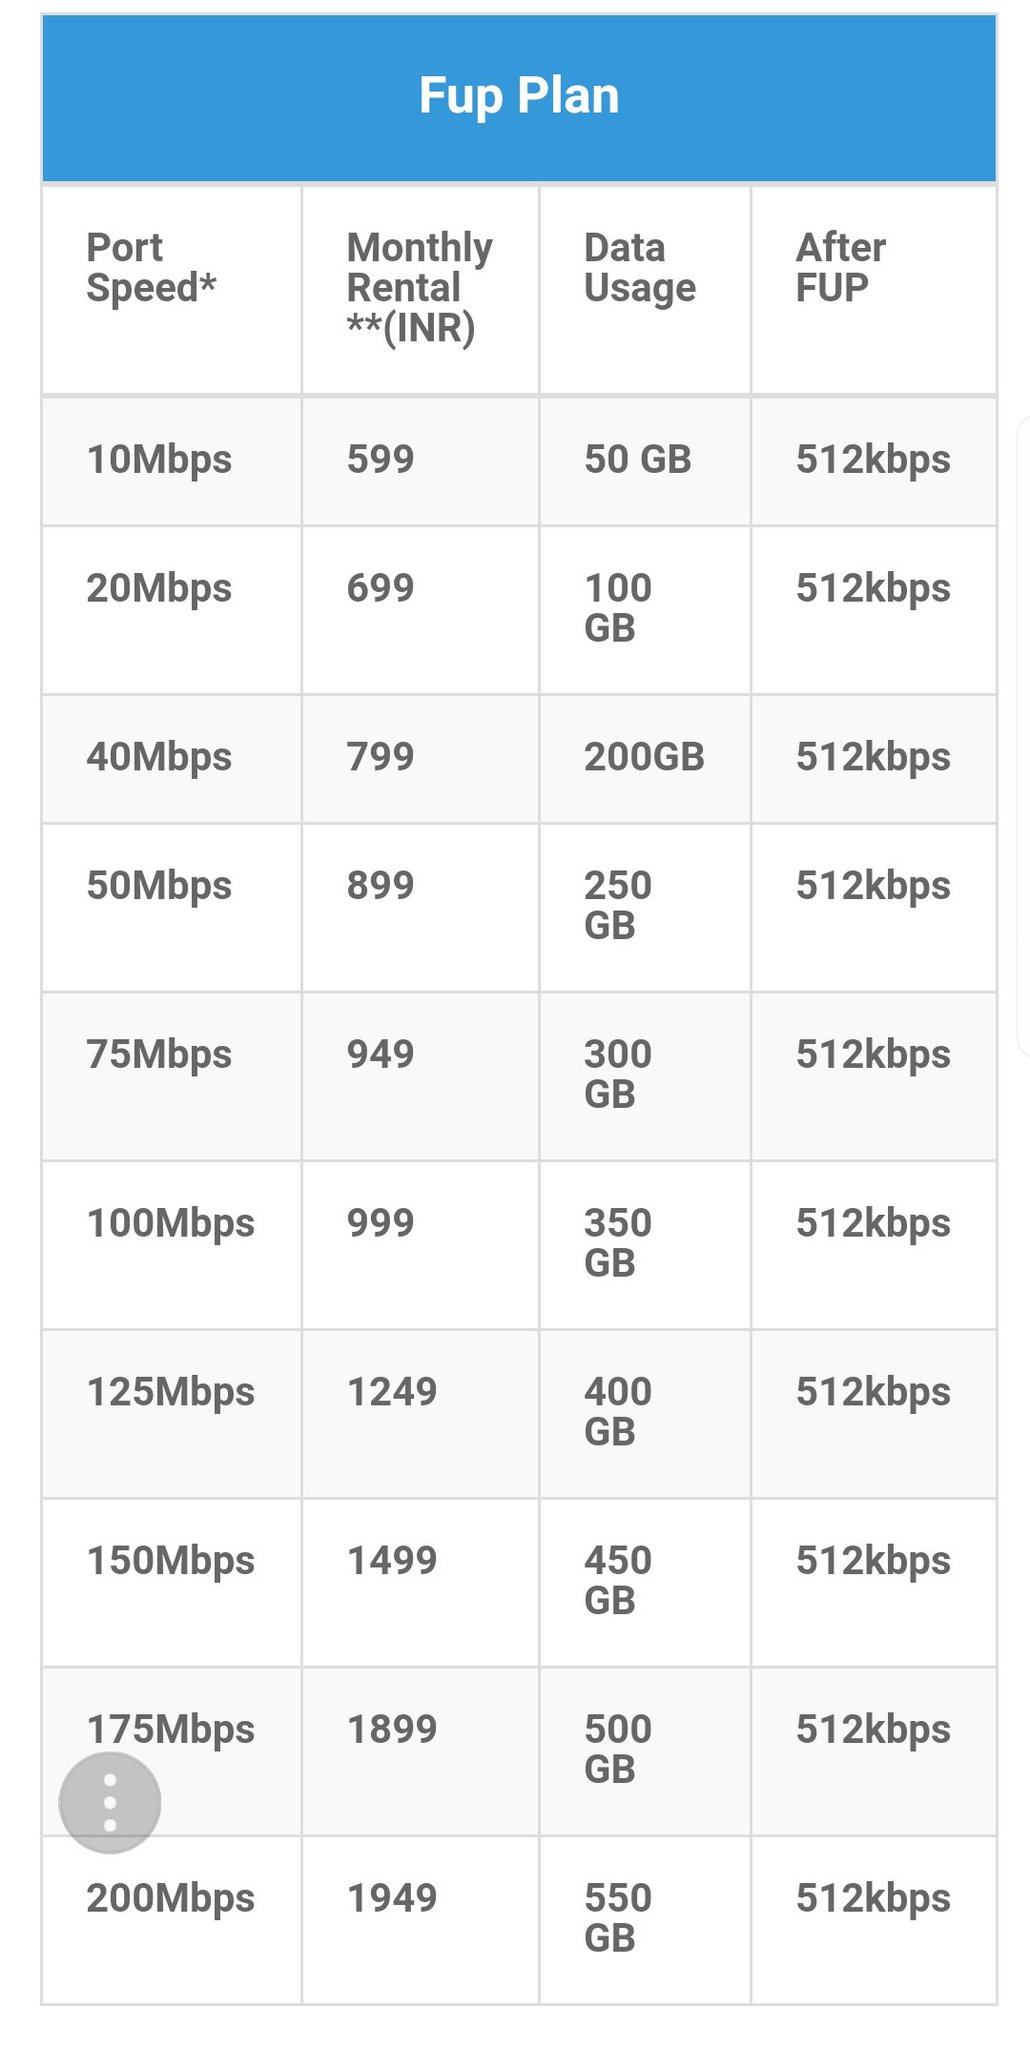
    Unlike previous plan, new plan offers lot of bandwidth for every plan. This help with Indias new media consumption started by Reliance JIO. Previous Maximum speed available was 100 Mbps. New maximum is 200 Mbps.

    RailWire 2018 FTTH Plans

    These new plans are not yet updated on RailWire web site, but many have reported new customers are getting these plans. My plan just got changed from 20 Mbps to 75 Mbps, 300 GB per month data transfer with same price as before.

    Reliance JIO made indians internet usage explode with very generous 4G mobile plans that give 1.5 GB data per day with free NetFlix like media service JioCinema and lot of Free TV Channels using JioTV Live TV App. These media services make any none internet users addicted to internet and data, they never able to live Reliance JIO even if they wanted.

    With Reliance JIO coming with with FTTH service with many part of the country, RailWire may be doing their part to keep their customers happy.

    new and old railwire plans are

    Old plan New FUB Data Plane Afther Speed Without TAX 18% tax
    2Mbps 10gb 10Mbps 50gb port speed 512Kbps Rs. 599 706.82/-
    2Mbps 20gb 20Mbps 100gb port speed 512Kbps Rs. 699 824.82/-
    4Mbps 40gb 40Mbps 200gb port speed 512Kbps Rs. 799 942.82/-
    10Mbps 80gb 50Mbps 250gb port speed 512Kbps Rs. 899 1060.82/
    20Mbps 100g 75Mbps 300gb port speed 512Kbps Rs. 949 1119.82/-
    40Mbps 60gb 100Mbps 350gb port speed 512Kbps Rs. 999 1178.82/-
    60Mbps 100g 125Mbps 400gb port speed 512Kbps Rs. 1,249 1473.82/-
    80Mbps 130g 150Mbps 450gb port speed 512Kbps Rs. 1,499 1768.82/-
    90Mbps 100g 175Mbps 500gb port speed 512Kbps Rs. 1,899 2240.82/-
    100Mbp 210g 200Mbps 550gb port speed 512Kbps Rs. 1,949 2299.82/

    These new plans make more internet services available in India.

    Indian Gamers will have good time with local game servers, so far they have to use Singapore, Europe or US servers to play games, that cause high lag in games with response time is critical to success.

    Online backup services will get more popular. I have 3 hard disks in my computer for backing up data because i don’t want to waste any of my bandwidth, with 75 Mbps or 100 Mbps connection, i may start using cloud backup services for backing up some of my data.

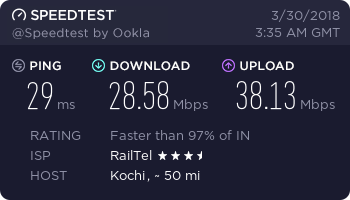
    Here is speed test on my 75 Mbps connection

    Railwire FTTH  speed test 2018

    Next month i may switch to 100 Mbps plan as price difference is very small (INR 59) even though it won’t make any difference in normal usage.

    I switch from BSNL to RailWire nearly a year ago. BSNL speed was 2 Mbps, they have very low FUP limit of 20 GB per month.

    http://www.bsnl.co.in/opencms/bsnl/BSNL/services/broadband/BB_plans_less_speed.html

    Even now they don’t change the plans. For INR 945, you get 10 Mbps speed until 20 GB FUP Limit, then speed goes down to 2 Mbps. Problem with BSNL for me was not speed, it was frequent down time due to cable problems as they use DSL and the cable are very old break multiple times a month and it take days for them to find the fault and fix it.