Blog

  • Magento 2 Password reset

    Magento 2 Password reset

    Magento 2 is popular open-source eCommerce software. If you lost admin password for your Magento 2 website, you can follow the instructions below to reset your password.

    Find the crypt key from file

    app/etc/evn.php
    

    Once you have the key, you can run following SQL command using MySQL command line or phpMyAdmin.

    UPDATE admin_user SET password = CONCAT(SHA2('CRYPTO_KEYnewPassword', 256), ':CRYPTO_KEY:1') WHERE username = 'admin';
    

    In the SQL above, replace

    CRYPTO_KEY = cyrpt key from your app/etc/evn.php file.
    newPassword = replace with new password you need.

    See Magento

  • Nginx php-fpm No input file specified

    Nginx php-fpm No input file specified

    When accessing PHP files from location block that have different document root specified using alias, i get error

    No input file specified.

    nginx php-fpm  error

    Here is the Nginx config i used

    server {
        listen 80; 
        server_name lab.test;
        root /www/lab.test/html;
        autoindex on;
        index index.php;
    
        location /ok/ {
            alias /www/serverok.test/html/;
    
            location ~ \.php$ {
                include snippets/fastcgi-php.conf;
                fastcgi_intercept_errors on;
                fastcgi_buffers 16 16k;
                fastcgi_buffer_size 32k;
                fastcgi_pass unix:/run/php/php7.4-fpm-boby.sock;
            }
    
        }
    
        location ~ \.php$ {
            include snippets/fastcgi-php.conf;
            fastcgi_intercept_errors on;
            fastcgi_buffers 16 16k;
            fastcgi_buffer_size 32k;
            fastcgi_pass unix:/run/php/php7.4-fpm-boby.sock;
        }
    }
    

    If I access an HTML file or any non-PHP file, it works properly from/ok/ location.

    The problem is due to php-fpm not able to find the proper path when using the alias. If I put the PHP files inside a folder /ok/, it worked.

    To fix the problem, add the following code before fastcgi_pass

    fastcgi_param    SCRIPT_FILENAME    $request_filename;
    fastcgi_param    SCRIPT_NAME        $fastcgi_script_name;
    

    Example

    nginx php-fpm error no input

    Back to Nginx

  • Amazon Lightsail Log in failed – CLIENT_UNAUTHORIZED

    Amazon Lightsail Log in failed – CLIENT_UNAUTHORIZED

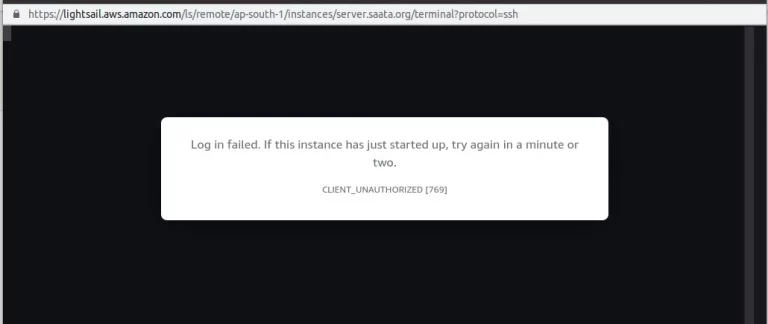
    When trying to log in to Amazon Lightsail instance, I got the error

    Log in failed. If this instance has just started up, try again in a minute or two.
    CLIENT_UNAUTHORIZED [769]
    Amazon Lightsail connect failed

    This lightsail refused to connect error happens because when you update the system, you replaced the default /etc/ssh/sshd_config file provided by Amazon AWS.

    To fix the error, connect to the Lightsail server using SSH (terminal on Linux/Mac, putty on windows), edit the file

    vi /etc/ssh/sshd_config

    At the end of the file, add the following 2 lines

    TrustedUserCAKeys /etc/ssh/lightsail_instance_ca.pub
    CASignatureAlgorithms +ssh-rsa

    Restart ssh service

    systemctl restart ssh

    Now you should be able to login to Amazon Lightsail using AWS Console.

    If your lightsail_instance_ca.pub file is corrupted, you can recreate it with the command

    cat /var/lib/cloud/instance/user-data.txt | grep ^ssh-rsa > /etc/ssh/lightsail_instance_ca.pub
    

    Method 2: Reover with shapshot

    If you can’t SSH into the server using putty or a terminal, you need to take a snapshot of the server. Create a new lightsail server based on the snapshot. During the new server creation, you have the option to reset the PEM file. You can also enter a startup script, that gets executed when the server is started the first time.

    Use the following startup script

    sudo sh -c "cat /var/lib/cloud/instance/user-data.txt | grep ^ssh-rsa > /etc/ssh/lightsail_instance_ca.pub"
    sudo sh -c "echo >> /etc/ssh/sshd_config" 
    sudo sh -c "echo 'TrustedUserCAKeys /etc/ssh/lightsail_instance_ca.pub' >> /etc/ssh/sshd_config"
    sudo sh -c "echo 'CASignatureAlgorithms ecdsa-sha2-nistp256,ecdsa-sha2-nistp384,ecdsa-sha2-nistp521,ssh-ed25519,rsa-sha2-512,rsa-sha2-256,ssh-rsa' >> /etc/ssh/sshd_config"
    sudo systemctl restart sshd
  • How to hide Nginx version

    How to hide Nginx version

    On a default installation of the Nginx web server, the error pages show the version of Nginx software running on your server. Displaying software version is not good for security and visitors don’t need to know what version of Nginx web server you are using. For hackers, if they know the version, they can see if that particular version of the Nginx web server is vulnerable to any exploit and hack the server if there is an exploit available.

    Nginx hide version

    To hide the Nginx version, edit

    vi /etc/nginx/nginx.conf
    

    Under “http” section, add

    server_tokens off;
    

    edit nginx.conf

    Restart Nginx

    systemctl restart nginx
    

    After restart, the error page won’t show the Nginx version.

    hide nginx version

    Before

    boby@sok-01:~$ curl -I http://serverok.test/
    HTTP/1.1 404 Not Found
    Server: nginx/1.18.0 (Ubuntu)
    Date: Sun, 14 Nov 2021 06:11:24 GMT
    Content-Type: text/html
    Content-Length: 162
    Connection: keep-alive

    boby@sok-01:~$

    After

    boby@sok-01:~$ curl -I http://serverok.test/
    HTTP/1.1 404 Not Found
    Server: nginx
    Date: Sun, 14 Nov 2021 06:20:54 GMT
    Content-Type: text/html
    Content-Length: 146
    Connection: keep-alive

    boby@sok-01:~$

    See Nginx

  • Magento 2 admin too many redirects error

    Magento 2 admin too many redirects error

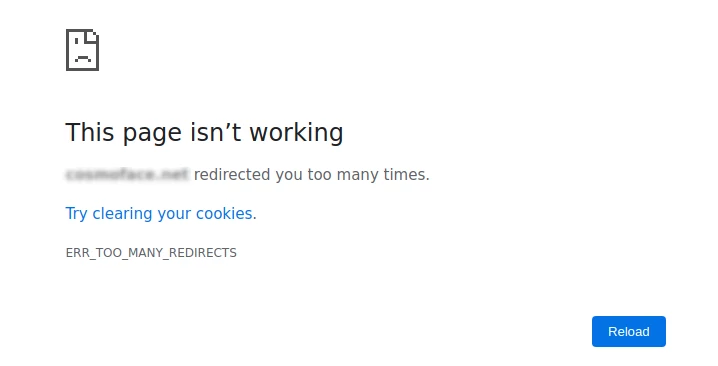
    On a Magento 2 site, after migrating to a new domain, when accessing the admin area, I get too many redirect error.

    magento 2 admin redirect error

    To fix, using the following SQL command verify URLs are correct.

    SELECT * FROM  core_config_data WHERE path like '%_url';
    

    if any URL is not correct, fix it.

    Then run the following commands in the Magento directory.

    php bin/magento cache:clean
    php bin/magento cache:flush
    php bin/magento indexer:reindex
    php bin/magento setup:upgrade
    php bin/magento setup:static-content:deploy -f
    

    See Magento

  • Cloudflare Restoring Visitor IP in Ubuntu Plesk Apache Server

    Cloudflare Restoring Visitor IP in Ubuntu Plesk Apache Server

    When using Cloudflare CDN, visitors come to the Cloudflare server and Cloudflare fetches pages from your server and sent to the visitor. Your server only sees Cloudflare’s IP address. To fix this, we can use the Apache module remoteip.

    On Ubuntu (or Debian) server running Plesk control panel with Apache webserver (no Nginx) do the following to restore real visitor IP address when using Cloudflare CDN.

    Enable mod_remoteip

    a2enmod remoteip

    Create file

    vi /etc/apache2/conf-enabled/remoteip.conf

    Add the following to the file

    RemoteIPHeader CF-Connecting-IP
    RemoteIPTrustedProxy 173.245.48.0/20
    RemoteIPTrustedProxy 103.21.244.0/22
    RemoteIPTrustedProxy 103.22.200.0/22
    RemoteIPTrustedProxy 103.31.4.0/22
    RemoteIPTrustedProxy 141.101.64.0/18
    RemoteIPTrustedProxy 108.162.192.0/18
    RemoteIPTrustedProxy 190.93.240.0/20
    RemoteIPTrustedProxy 188.114.96.0/20
    RemoteIPTrustedProxy 197.234.240.0/22
    RemoteIPTrustedProxy 198.41.128.0/17
    RemoteIPTrustedProxy 162.158.0.0/15
    RemoteIPTrustedProxy 104.16.0.0/12
    RemoteIPTrustedProxy 172.64.0.0/13
    RemoteIPTrustedProxy 131.0.72.0/22
    RemoteIPTrustedProxy 2400:cb00::/32
    RemoteIPTrustedProxy 2606:4700::/32
    RemoteIPTrustedProxy 2803:f800::/32
    RemoteIPTrustedProxy 2405:b500::/32
    RemoteIPTrustedProxy 2405:8100::/32
    RemoteIPTrustedProxy 2a06:98c0::/29
    RemoteIPTrustedProxy 2c0f:f248::/32

    Restart Apache

    systemctl restart apache2

    Now the site will show real visitor IP. You can verify with phpinfo() page, and search for RMOTE_ADDR to see real visitor IP.

    Back to Cloudflare

  • Magento Disable CDN

    Magento Disable CDN

    To see URLs configured on a Magento 2 installation, run the following SQL command

    select * from core_config_data where path like '%_url';
    

    Example

    mysql> select * from core_config_data where path like '%_url';
    +-----------+---------+----------+------------------------------------+------------------------------------------------------------------------+---------------------+
    | config_id | scope   | scope_id | path                               | value                                                                  | updated_at          |
    +-----------+---------+----------+------------------------------------+------------------------------------------------------------------------+---------------------+
    |        10 | default |        0 | web/unsecure/base_url              | https://buildingplans.com/                                             | 2021-11-09 19:39:03 |
    |       200 | default |        0 | payment/braintree/descriptor_url   | NULL                                                                   | 2020-10-14 06:23:31 |
    |       587 | default |        0 | web/unsecure/base_static_url       | https://621984-2039577-raikfcquaxqncofqfm.stackpathdns.com/pub/static/ | 2021-08-05 10:18:30 |
    |       588 | default |        0 | web/unsecure/base_media_url        | https://621984-2039577-raikfcquaxqncofqfm.stackpathdns.com/pub/media/  | 2021-08-05 10:18:30 |
    |       589 | default |        0 | web/secure/base_url                | https://buildingplans.com/                                             | 2021-11-09 19:39:03 |
    |       591 | default |        0 | web/secure/base_static_url         | https://621984-2039577-raikfcquaxqncofqfm.stackpathdns.com/pub/static/ | 2021-08-05 10:18:30 |
    |       592 | default |        0 | web/secure/base_media_url          | https://621984-2039577-raikfcquaxqncofqfm.stackpathdns.com/pub/media/  | 2021-08-05 10:18:30 |
    +-----------+---------+----------+------------------------------------+------------------------------------------------------------------------+---------------------+
    8 rows in set (0.00 sec)
    
    mysql> 
    

    In this case, the site use stackpath CDN.

    To remove CDN, you can delete the entries related stackpathdns with SQL command

    delete from core_config_data where path = 'web/unsecure/base_static_url';
    delete from core_config_data where path = 'web/unsecure/base_media_url';
    delete from core_config_data where path = 'web/secure/base_static_url';
    delete from core_config_data where path = 'web/secure/base_media_url';
    

    Now you need to re-deploy the static assets with

    php bin/magento setup:static-content:deploy
    

    clear cache

    php bin/magento cache:flush
    
  • PrestaShop Enable Memcached

    PrestaShop Enable Memcached

    You need to install the memcached daemon and PHP module on the server before you can configure it in PrestaSop. You can find instructions for doing this in

    Once you have Memcached installed, you can enable it in the PrestaShop Admin area. Go to

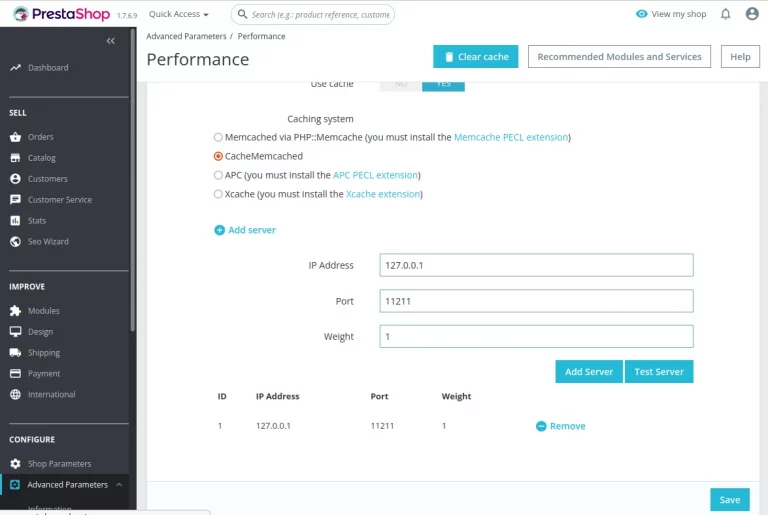
    PrestaShop administrator > Advanced Parameters > Performance
    

    In the Performance page, scroll down to the CACHING. Set “Use Cache” to Yes.

    Enable memcached in PrestaShop

    Select the Memcached option. Click on Add Server. Enter IP address and port of your Memcached installation. This is usually 127.0.0.1 and 11211.

    See PrestaShop

  • How to Install PHP 5.6 on Oracle Linux 7

    How to Install PHP 5.6 on Oracle Linux 7

    Oracle Linux is a free RHEL based Linux distro. We will install PHP 5.6 on an Oracle Linux 7 server.

    First, enable EPEL repo

    yum install https://dl.fedoraproject.org/pub/epel/epel-release-latest-7.noarch.rpm
    

    Enable Remi repo

    yum install http://rpms.remirepo.net/enterprise/remi-release-7.rpm
    

    Install yum-utils package

    yum install yum-utils
    

    Enable remi-php56

    yum-config-manager --enable remi-php56
    

    Install PHP 5.6 with

    yum install -y php php-bcmath php-cli php-common php-devel php-gd \
        php-imap php-intl php-json php-ldap php-lz4 php-mbstring php-mysqlnd \
        php-soap php-intl php-opcache php-xml php-pdo
    

    This will only install the CLI version of PHP 5.6. To make Apache work with PHP 5.6, install

    yum install php-pecl-http.x86_64
    

    This will create file /etc/httpd/conf.d/php.conf, that enable PHP module in Apache.

    Restart apache webserver

    systemctl restart httpd
    

    Now Apache will be able to serve PHP files.

  • Google Workspace DKIM authentication settings failed.

    Google Workspace DKIM authentication settings failed.

    When generating DKIM in google Google Workspace I got the following error message.

    DKIM authentication settings failed
    

    This error happens when you have a newly activated Google Workspace account.

    As per Google support instructions at

    https://support.google.com/a/answer/174126

    You need to wait 24 to 78 hours before activating DKIM.

    Important: After you create your Google Workspace account and turn on Gmail, you must wait 24–72 hours before you can generate a DKIM key.

  • Install Jenkins on Ubuntu

    Install Jenkins on Ubuntu

    Jenkins is an open source automation server. It helps automate the parts of software development related to building, testing, and deploying, facilitating continuous integration and continuous delivery.

    Jenkins is a Java Application. So you need to install JRE (Java Runtime Environment). Install it with

    sudo apt-get install default-jre
    

    You can find instructions for installing Jenkins on Debian/Ubuntu at

    https://pkg.jenkins.io/debian-stable/

    Install Jenkins

    wget -q -O - https://pkg.jenkins.io/debian-stable/jenkins.io.key | sudo apt-key add -
    sudo sh -c 'echo deb https://pkg.jenkins.io/debian-stable binary/ > /etc/apt/sources.list.d/jenkins.list'
    sudo apt-get update
    sudo apt-get install jenkins
    

    Enable Jenkins to start on boot

    sudo systemctl enable jenkins
    

    Start Jenkins

    sudo systemctl start jenkins
    

    To check status

    sudo systemctl status jenkins
    

    You can verify Jenkins running on port 8080 with command

    root@jenkins:~# netstat -lntp
    Active Internet connections (only servers)
    Proto Recv-Q Send-Q Local Address           Foreign Address         State       PID/Program name    
    tcp        0      0 127.0.0.53:53           0.0.0.0:*               LISTEN      186/systemd-resolve 
    tcp        0      0 0.0.0.0:22              0.0.0.0:*               LISTEN      256/sshd: /usr/sbin 
    tcp6       0      0 :::22                   :::*                    LISTEN      256/sshd: /usr/sbin 
    tcp6       0      0 :::8080                 :::*                    LISTEN      4774/java           
    root@jenkins:~#
    

    To find the initial password, run the command

    cat /var/lib/jenkins/secrets/initialAdminPassword