Category: Linux

  • Rsync backup with X days retention

    rsync is run on backup server, that login to remote servers and backup.

    vi /usr/serverok/rsync-backup.sh
    

    Add following code

    #!/bin/sh
    
    
    date
    
    rsync --archive --verbose --exclude-from=/usr/serverok/.rsync-exclude root@SERVER-IP:/ /backup/HOSTNAME-HERE/sda1/
    echo "RSYNC: HOSTNAME-HERE..........OK" | mail -s 'HOSTNAME-HERE RSYNC' [email protected]
    
    
    date
    

    Repeat the rsync/echo lines for each server you need to backup.

    We exclude some of the files from backup, this is specified in .rsync-exclude file.

    # cat .rsync-exclude 
    /boot
    /backup
    /mnt
    /tmp
    /cdrom
    /media
    /proc
    /sys
    # 
    

    Run it with cronjob

    20 0 * * * /usr/serverok/rsync-backup.sh &> /var/log/serverok-rsync-backup.log
    

    Backup Rotation

    We rotate backup, so we have 20 days of backups. To do this, run cronjob

    0 1 * * * /usr/serverok/rsync-backup-rotate.sh &>  /var/log/serverok-rsync-backup-rotate.log
    

    Create script

    vi /usr/serverok/rsync-backup-rotate.sh
    

    With following content

    #!/bin/bash
    
    date
    BACKUP_IDS=(01 02 03 04 05 06 07 08 09 10 11 12 13 14 15 16 17 18 19 20)
    PATHES=(/backup/server10 /backup/server20 /backup/server22 /backup/server24 /backup/server32 /backup/server48)
    
    # Create backup directories
    
    for ((i=0; i < ${#BACKUP_IDS[*]}; i++)); do
            if [ ! -d /backup/${BACKUP_IDS[$i]} ]; then
                    mkdir -p /backup/${BACKUP_IDS[$i]}
            fi
    done
    
    # Rotate backup directories
    
    mv /backup/${#BACKUP_IDS[*]} /backup/00
    for ((i=${#BACKUP_IDS[*]}-2; i >= 0; i-- )); do
            j=$i+1
            mv /backup/${BACKUP_IDS[$i]} /backup/${BACKUP_IDS[$j]}
    done
    
    mv /backup/00 /backup/01
    
    # Backup into backup directory 01
    
    touch -m /backup/01/
    for ((i=0; i < ${#PATHES[*]}; i++)); do
            mkdir -p /backup/01${PATHES[$i]}/
            rsync -avl --delete --exclude-from=/usr/serverok/excludes.txt --link-dest=/backup/02${PATHES[$i]}/ ${PATHES[$i]}/ /backup/01${PATHES[$i]}/
    done
    date
    exit
    

    Here you need to add a folder for each server on line PATHES.

    Here is content of excludes.txt

    # cat /usr/serverok/excludes.txt
    .svn
    .DS_Store
    ._*
    *.log
    *.log.gz
    *.log.*.gz
    access_log
    access_log.*
    access_ssl_log
    access_ssl_log.*
    error_log
    error_log.*
    xferlog_regular
    xferlog_regular.*
    # 
    
  • lvm

    vgcreate
    pvdisplay
    lvdisplay
    lvcreate
    Resize EC2 file system with LVM
    pvcreate Device /dev/sdb excluded by a filter
    How to Remove a logical volume
    Mounting partition stored inside Logical Volume
    How to add physical volume and resize LVM

    Some related commands

    cfdisk
    vgextend vg /dev/sda5
    lvextend -l+100%FREE /dev/vg/lv_root
    resize2fs /dev/mapper/vg-lv_root
    

    When I try to mount a partition I get error

    mount: unknown filesystem type ‘LVM2_member’

    This is because the partition is LVM. Got it fixed with

    root@sysresccd /root % parted -l
    Model: ATA Samsung SSD 850 (scsi)
    Disk /dev/sda: 500GB
    Sector size (logical/physical): 512B/512B
    Partition Table: msdos
    Disk Flags:
    
    Number  Start   End     Size    Type     File system  Flags
     1      1049kB  3146kB  2097kB  primary
     2      3146kB  527MB   524MB   primary  ext2         boot
     3      527MB   500GB   500GB   primary               lvm
    
    
    root@sysresccd /root % mount /dev/sda3 /mnt
    mount: unknown filesystem type 'LVM2_member'
    root@sysresccd /root % lvmdiskscan
      WARNING: lvmetad is running but disabled. Restart lvmetad before enabling it!
      /dev/loop0          [     275.14 MiB]
      /dev/mapper/vg-swap [      15.75 GiB]
      /dev/sda1           [       2.00 MiB]
      /dev/mapper/vg-tmp  [       1.00 GiB]
      /dev/sda2           [     500.00 MiB]
      /dev/mapper/vg-root [     448.46 GiB]
      /dev/sda3           [     465.27 GiB] LVM physical volume
      3 disks
      3 partitions
      0 LVM physical volume whole disks
      1 LVM physical volume
    root@sysresccd /root % lvscan
      WARNING: lvmetad is running but disabled. Restart lvmetad before enabling it!
      ACTIVE            '/dev/vg/swap' [15.75 GiB] inherit
      ACTIVE            '/dev/vg/tmp' [1.00 GiB] inherit
      ACTIVE            '/dev/vg/root' [448.46 GiB] inherit
    root@sysresccd /root % mount /dev/vg/root /mnt
    root@sysresccd /root %
    
  • iftop

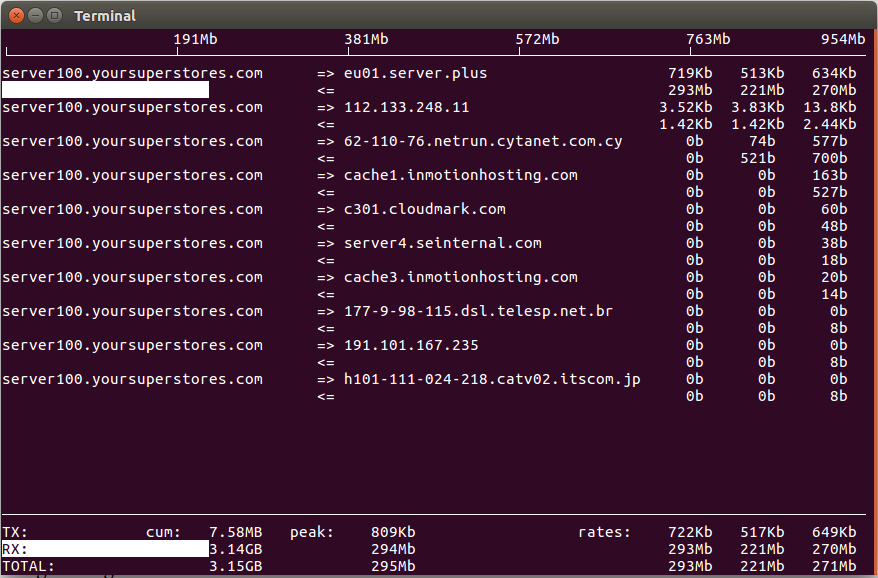
    iftop show bandwidth usage like top show cpu and memory usage.

    To see network usage, run

    iftop
    

    If you have multiple network interface, you need to specify network interface to monitor, this can be done with -i option

    iftop -i eth1
    

    To install on CentOS, run

    yum install iftop
    

    For installing from source, see Install iftop from source on CentOS

    On Ubuntu

    apt -y install iftop
    

    To use, run iftop

    iftop

  • monit

    See gonit golang replacement for monit

    monit is a process monitoring service that monitor services, restart if required.

    https://mmonit.com/monit/

    Install monit

    monit configuration

    Here are monit rules used to monitor apache, php-fpm and MySQL on bitnami cloud server.

    # cat apache.conf
    check process apache
      with pidfile "/opt/bitnami/apache2/logs/httpd.pid"
      start program = "/opt/bitnami/apache2/scripts/ctl.sh start" with timeout 90 seconds
      stop program = "/opt/bitnami/apache2/scripts/ctl.sh stop" with timeout 90 seconds
    
    # cat php-fpm.conf
    check process php-fpm
      with pidfile "/opt/bitnami/php/var/run/php5-fpm.pid"
      start program = "/opt/bitnami/php/scripts/ctl.sh start" with timeout 90 seconds
      stop program = "/opt/bitnami/php/scripts/ctl.sh stop" with timeout 90 seconds
    
    # cat mysql.conf
    check process mysql
      with pidfile "/opt/bitnami/mysql/data/mysqld.pid"
      start program = "/opt/bitnami/mysql/scripts/ctl.sh start" with timeout 90 seconds
      stop program = "/opt/bitnami/mysql/scripts/ctl.sh stop" with timeout 90 seconds
    
    #
    

    monitor php-fpm

    check process php7-fpm with pidfile "/var/run/php/php7.0-fpm.pid"
        if cpu > 80% for 2 cycles then alert
    
  • rtorrent

    rtorrent is a command line torrent client.

    https://github.com/rakshasa/rtorrent

    This can be run from SSH connection/terminal.

    CTRL + S Start torrent.
    CTRL + Q Quit torrent.
    CTRL + D Delete selected torrent. You can use arrow keys to select torrent to delete.

    Download Magnet Link

    1. Press Enter
    2. Paste Magnet link.
    3. Press Enter.

  • Mail

    Mail Server

    These software once installed will provide complete mail server including web mail.

    Business Email

    Free Email Forwarding

    Mail DNS Settings

    Webmail

    Email Marketing

    Newsletter

    Encrypted Email

    Email Clients for Linux

    To install mail command.

    on Debian, run

    apt-get install mailutils -y

    on CentOS

    yum install mailx -y

    To send a test email, run

    echo 'Test passed.' | mail -s Test-Email [email protected]

    To specify sender address, use -r option

    echo 'Test passed.' | mail -s Test-Email -r [email protected] [email protected]
  • vnstat

    vnstat command shows bandwidth usage on your system.

    [root@server12 ~]# vnstat
    Database updated: Wed Dec 13 06:51:43 2017
    
       eth0 since 11/04/13
    
              rx:  4.81 TiB      tx:  63.40 TiB      total:  68.21 TiB
    
       monthly
                         rx      |     tx      |    total    |   avg. rate
         ------------------------+-------------+-------------+---------------
           Nov '17     94.81 GiB |    2.02 TiB |    2.11 TiB |    7.00 Mbit/s
           Dec '17     54.05 GiB |    1.00 TiB |    1.05 TiB |    8.51 Mbit/s
         ------------------------+-------------+-------------+---------------
         estimated    136.37 GiB |    2.52 TiB |    2.65 TiB |
    
       daily
                         rx      |     tx      |    total    |   avg. rate
         ------------------------+-------------+-------------+---------------
         yesterday      4.45 GiB |   84.15 GiB |   88.60 GiB |    8.60 Mbit/s
             today      1.36 GiB |   25.79 GiB |   27.15 GiB |    9.22 Mbit/s
         ------------------------+-------------+-------------+---------------
         estimated      4.77 GiB |   90.35 GiB |   95.11 GiB |
    [root@server12 ~]# 
    

    Bandwidth usage by day

    [root@server12 ~]# vnstat -d
    
     eth0  /  daily
    
             day         rx      |     tx      |    total    |   avg. rate
         ------------------------+-------------+-------------+---------------
          11/14/17      3.11 GiB |   71.21 GiB |   74.32 GiB |    7.22 Mbit/s
          11/15/17      2.97 GiB |   68.86 GiB |   71.83 GiB |    6.97 Mbit/s
          11/16/17      3.14 GiB |   69.58 GiB |   72.72 GiB |    7.06 Mbit/s
          11/17/17      3.11 GiB |   72.84 GiB |   75.95 GiB |    7.37 Mbit/s
          11/18/17      2.87 GiB |   70.07 GiB |   72.94 GiB |    7.08 Mbit/s
          11/19/17      3.96 GiB |   64.32 GiB |   68.28 GiB |    6.63 Mbit/s
          11/20/17      2.71 GiB |   62.55 GiB |   65.26 GiB |    6.34 Mbit/s
          11/21/17      2.89 GiB |   66.82 GiB |   69.72 GiB |    6.77 Mbit/s
          11/22/17      2.86 GiB |   66.28 GiB |   69.14 GiB |    6.71 Mbit/s
          11/23/17      3.14 GiB |   72.26 GiB |   75.40 GiB |    7.32 Mbit/s
          11/24/17      3.26 GiB |   67.98 GiB |   71.24 GiB |    6.92 Mbit/s
          11/25/17      3.01 GiB |   66.87 GiB |   69.87 GiB |    6.78 Mbit/s
          11/26/17      3.70 GiB |   64.83 GiB |   68.53 GiB |    6.65 Mbit/s
          11/27/17      3.01 GiB |   68.27 GiB |   71.28 GiB |    6.92 Mbit/s
          11/28/17      2.88 GiB |   66.41 GiB |   69.29 GiB |    6.73 Mbit/s
          11/29/17      3.42 GiB |   73.41 GiB |   76.83 GiB |    7.46 Mbit/s
          11/30/17      2.94 GiB |   67.57 GiB |   70.52 GiB |    6.85 Mbit/s
          12/01/17      3.98 GiB |   73.32 GiB |   77.30 GiB |    7.51 Mbit/s
          12/02/17      3.86 GiB |   73.75 GiB |   77.61 GiB |    7.54 Mbit/s
          12/03/17      4.37 GiB |   79.14 GiB |   83.51 GiB |    8.11 Mbit/s
          12/04/17      3.64 GiB |   78.50 GiB |   82.14 GiB |    7.97 Mbit/s
          12/05/17      4.14 GiB |   80.11 GiB |   84.25 GiB |    8.18 Mbit/s
          12/06/17      4.61 GiB |   85.19 GiB |   89.80 GiB |    8.72 Mbit/s
          12/07/17      4.86 GiB |   85.86 GiB |   90.72 GiB |    8.81 Mbit/s
          12/08/17      4.56 GiB |   89.35 GiB |   93.91 GiB |    9.12 Mbit/s
          12/09/17      4.62 GiB |   88.69 GiB |   93.31 GiB |    9.06 Mbit/s
          12/10/17      5.11 GiB |   90.39 GiB |   95.50 GiB |    9.27 Mbit/s
          12/11/17      4.49 GiB |   88.47 GiB |   92.96 GiB |    9.03 Mbit/s
          12/12/17      4.45 GiB |   84.15 GiB |   88.60 GiB |    8.60 Mbit/s
          12/13/17      1.38 GiB |   26.12 GiB |   27.50 GiB |    9.23 Mbit/s
         ------------------------+-------------+-------------+---------------
         estimated      4.76 GiB |   90.43 GiB |   95.19 GiB |
    [root@server12 ~]# 
    
  • ip

    Ubuntu

    CentOS

    IPv6 Configuration

    Track IP location

    http://www.ip-tracker.org

    To see network interface cards on your computer, run “ip link”

    root@root1027:~# ip link
    1: lo:  mtu 65536 qdisc noqueue state UNKNOWN mode DEFAULT group default 
        link/loopback 00:00:00:00:00:00 brd 00:00:00:00:00:00
    2: eth2:  mtu 1500 qdisc noop state DOWN mode DEFAULT group default qlen 1000
        link/ether 90:e2:ba:2b:b0:5d brd ff:ff:ff:ff:ff:ff
    3: eth1:  mtu 1500 qdisc noop state DOWN mode DEFAULT group default qlen 1000
        link/ether 00:16:17:d2:44:6e brd ff:ff:ff:ff:ff:ff
    4: eth0:  mtu 1500 qdisc pfifo_fast state UP mode DEFAULT group default qlen 1000
        link/ether 90:e2:ba:2b:b0:0d brd ff:ff:ff:ff:ff:ff
    root@root1027:~# 
    
  • Configure Munin Node

    To install munin node on Ubuntu/Debian, run

    apt install -y munin-node
    

    To configure, edit file

    vi /etc/munin/munin-node.conf
    

    Find

    allow ^127\.0\.0\.1$
    

    Below this line, you need to add IP of your Munin Master. You need to convert IP to regular expression format before adding. For example, if your IP is 88.212.32.35, you need to add

    allow ^88\.212\.32\.35$
    

    If you want to allow from any IP, add

    allow ^.*$
    

    Now restart Munin node

    systemctl restart munin-node
    

    Add Node to Munin Master

    You need to tell your Munin master about the new node you have installed. To do this, edit file

    vi /etc/munin/munin.conf
    

    In this file, add

    [hostname-of-new-node-server]
        address IP_ADDR_OF_NODE
        use_node_name yes
    

    Now you need to wait like 5 minutes for Munin master to fetch the data. Munin master run the command /usr/bin/munin-cron to fetch data from every configured nodes.

    If you have any problem with updating data, check the log files for more info.

    /var/log/munin/munin-update.log => is the log file for munin master.

    /var/log/munin/munin-node.log => is the log file for munin node.

    Make sure you can connect to port 4949 of node server from master. If any firewall blocking, you need to open the port for munin to fetch the data.

    root@monitor:~# nc 82.211.1.93 4949
    # munin node at root1272.premium-rootserver.net
    # Unknown command. Try cap, list, nodes, config, fetch, version or quit
    quit
    root@monitor:~# 
    
  • netdata

    To install netdata, run

    wget -O /tmp/netdata-kickstart.sh https://get.netdata.cloud/kickstart.sh
    sh /tmp/netdata-kickstart.sh

    Once installed, you will be able to see server stats at

    http://your-ip:19999

    Stop/start/restart netdata

    systemctl stop netdata
    systemctl start netdata
    systemctl restart netdata
  • sed

    sed can be used to replace text in a file.

    sed -i 's/old-string/new-string/g'  file-name.txt

    g = Global, replace everything in a file.
    s = substitute text
    -i = update the file.

    Delete lines matching string

    To delete lines having a string and print the result.

    sed '/string to match/d' file-name.txt

    To update the file, use -i option

    sed -i '/string to match/d' file-name.txt

    Search & Replace using rpl

  • VestaCP Free Hosting Control Panel

    VestaCP Free Hosting Control Panel

    Reset VestaCP admin password
    MySQL root password in VestaCP
    Change Server Hostname in VestaCP
    VestaCP SSL for mail server
    VestaCP redirect webmail to HTTPS
    VestaCP Update
    Install PHP 7 on CentOS VestaCP
    VestaCP disable Backups
    How to change IP address of VestaCP Server

    VestaCP Free Hosting Control Panel

    You can login to VestaCP at

    https://YOUR-IP-ADDR:8083/login/
    User = root
    PW = your root password
    

    phpMyAdmin available at

    http://YOUR-IP-ADDR/phpmyadmin/

    You can see phpMyAdmin Nginx config at /etc/nginx/conf.d/phpmyadmin.inc

    Web Site DocumentRoot

    Web sites are stored in folder

    /home/USERNAME/web/DOMAINNAME/public_html
    

    Log Files

    /var/log/nginx/domains/ => stores Nginx Access and error logs for hosted web sites.

    Configuration Files

    php-fpm configurations for each web sites are stored in /etc/php-fpm.d/DOMAIN.conf, each web sites runs php-fpm in its own pool. Here is sample config

    [root@localhost ~]# cat /etc/php-fpm.d/localhost.localdomain.conf 
    [localhost.localdomain]
    listen = 127.0.0.1:9001
    listen.allowed_clients = 127.0.0.1
    
    user = admin
    group = admin
    
    pm = dynamic
    pm.max_children = 50
    pm.start_servers = 3
    pm.min_spare_servers = 2
    pm.max_spare_servers = 10
    
    env[HOSTNAME] = $HOSTNAME
    env[PATH] = /usr/local/bin:/usr/bin:/bin
    env[TMP] = /tmp
    env[TMPDIR] = /tmp
    env[TEMP] = /tmp
    [root@localhost ~]# 
    

    Apache/Nginx configuration in folder : /home/admin/conf/web (admin is user, if you have other users, check folder for the user)

    VestaCP Installer Compromised

    See Hosting Control Panel