Blog

  • PrestaShop add customer email to invoice

    PrestaShop add customer email to invoice

    PrestaShop PDF invoice won’t show customer email address by default for some strange reason. To show the email address in the Invoice, we need to manually modify PrestaShop files. This instruction is tested on PrestaShop version 1.7.6.7.

    To show customer email address in PrestaShop PDF invoice, edit file

    vi classes/pdf/HTMLTemplateInvoice.php
    

    On line 329, find

            $data = array(
                'order' => $this->order,
                'order_invoice' => $this->order_invoice,
                'order_details' => $order_details,
                'carrier' => $carrier,
                'cart_rules' => $cart_rules,
                'delivery_address' => $formatted_delivery_address,
                'invoice_address' => $formatted_invoice_address,
                'addresses' => array('invoice' => $invoice_address, 'delivery' => $delivery_address),
                'tax_excluded_display' => $tax_excluded_display,
                'display_product_images' => $display_product_images,
                'layout' => $layout,
                'tax_tab' => $this->getTaxTabContent(),
                'customer' => $customer,
                'footer' => $footer,
                'ps_price_compute_precision' => _PS_PRICE_COMPUTE_PRECISION_,
                'round_type' => $round_type,
                'legal_free_text' => $legal_free_text,
            );  
    

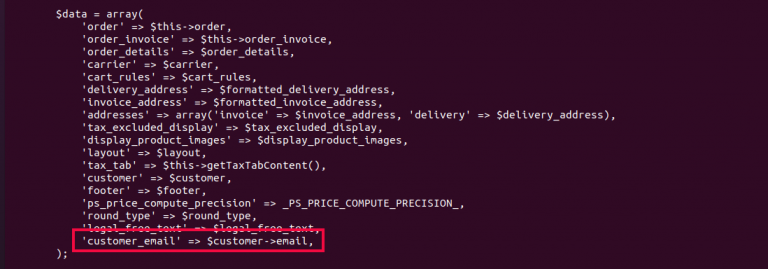
    Inside the array, add

    'customer_email' => $customer->email,
    

    PrestaShop show customer email

    Now edit file pdf/invoice.addresses-tab.tpl

    vi pdf/invoice.addresses-tab.tpl
    

    Find

    {$delivery_address}
    

    Add below


    {$customer_email}

    Here is the modified content

    {if $delivery_address}{l s='Delivery Address' d='Shop.Pdf' pdf='true'}

    {$delivery_address}
    {$customer_email} {/if}
    {l s='Billing Address' d='Shop.Pdf' pdf='true'}

    {$invoice_address}
    {$customer_email}

    Now if you download an invoice, the email address will show below the customer Delivery and Billing Address.

    Back to PrestaShop

  • How to verify rDNS (reverse DNS)/PTR Record

    How to verify rDNS (reverse DNS)/PTR Record

    RDNS (Reverse DNS) resolves an IP address to a domain name. To find rDNS for an IP address, you can use the command nslookup.

    nslookup IP_ADDR_HERE
    

    check rdns with nslookup

    In the above screenshot, IP address 51.38.246.115 have reverse DNS set to ok.serverok.in

    You also need to verify the hostname points to IP address. Many server providers check this before settings reverse dns entry.

    root@server12:~# nslookup ok.serverok.in
    Server:		213.133.99.99
    Address:	213.133.99.99#53
    
    Non-authoritative answer:
    Name:	ok.serverok.in
    Address: 51.38.246.115
    
    root@server12:~# 
    

    Find rDNS using dig command

    To find rDNS of an IP address, use the command

    dig +short -x IP_ADDR_HERE
    

    Example

    root@server12:~# dig +short -x 51.38.246.115
    ok.serverok.in.
    root@server12:~# 
    root@server12:~# dig +noall +answer -x 51.38.246.115
    115.246.38.51.in-addr.arpa. 86400 IN	PTR	ok.serverok.in.
    root@server12:~# 
    

    Find rDNS using host command

    host IP_ADDR_HERE
    

    Example

    root@server12:~# host 51.38.246.115
    115.246.38.51.in-addr.arpa domain name pointer ok.serverok.in.
    root@server12:~# 
    

    Back to Reverse DNS

  • automation

    https://n8n.io/ – n8n.io is a free and open-source workflow automation tool that lets you connect anything to everything. It is a node-based platform, which means that you can create workflows by connecting different nodes together. Each node represents a different task or action, such as sending an email, posting a message to Slack, or creating a new record in a CRM system.

    back to scripts

  • How to debug Apache VirtualHost not working

    How to debug Apache VirtualHost not working

    On an Apache webserver running in Ubuntu, I added a VirtualHost entry for a domain name. But instead of showing the page, it shows the website from the default Apache VirtualHost (000-default.conf). At first, I was thinking it is because Apache was somehow not able to handle Named Virtual Hosts. So I created another domain name on the server, that worked fine. Only this specific domain name VirtualHost did not work.

    To see Apache VirtualHost configuration, run

    apachectl -S
    

    When I run the above command, the domain name with the problem was listed as the default website. I changed 000-default.conf, no domain name was specified in the file. The problem was because the hostname of the server is the same as the domain name I was trying to set up.

    To fix this, I change the hostname of the webserver with the command

    hostname-ctl set-hostname NEW_HOSTNAME_HERE
    

    Restart Apache web server

    systemctl restart apache2
    

    See Apache

  • postfix smtp Must issue a STARTTLS command first

    postfix smtp Must issue a STARTTLS command first

    When sending an email to a server, mail bounced with the following error message.

    Action: failed
    Status: 5.7.0
    Remote-MTA: dns; mail01.riedelbau.de
    Diagnostic-Code: smtp; 530 5.7.0 Must issue a STARTTLS command first
    

    To fix the error, first enabled debug in postfix for the Remote-MTA, for this, edit file

    vi /etc/postfix/main.cf
    

    Add the following lines. You need to remove these lines after debug is completed or your log file will get larger with debug log.

    debug_peer_list=mail01.riedelbau.de
    debug_peer_level=3
    

    Restart postfix mail server.

    systemctl restart postfix
    

    Now I send a mail, in /var/log/mail.log, I got the detailed error message.

    Sep 17 08:32:25 mail postfix/smtp[31356]: vstream_buf_get_ready: fd 14 got 64
    Sep 17 08:32:25 mail postfix/smtp[31356]: < mail01.riedelbau.de[93.188.26.3]:25: 220 mail01.riedelbau.de ESMTP Fri, 17 Sep 2021 08:32:23 +0200 
    Sep 17 08:32:25 mail postfix/smtp[31356]: > mail01.riedelbau.de[93.188.26.3]:25: EHLO smtp1.serverok.in
    Sep 17 08:32:25 mail postfix/smtp[31356]: vstream_fflush_some: fd 14 flush 31
    Sep 17 08:32:25 mail postfix/smtp[31356]: vstream_buf_get_ready: fd 14 got 221
    Sep 17 08:32:25 mail postfix/smtp[31356]: < mail01.riedelbau.de[93.188.26.3]:25: 250-mail01.riedelbau.de Hello [173.249.63.91]
    Sep 17 08:32:25 mail postfix/smtp[31356]: < mail01.riedelbau.de[93.188.26.3]:25: 250-TURN
    Sep 17 08:32:25 mail postfix/smtp[31356]: < mail01.riedelbau.de[93.188.26.3]:25: 250-SIZE 36700160
    Sep 17 08:32:25 mail postfix/smtp[31356]: < mail01.riedelbau.de[93.188.26.3]:25: 250-ETRN
    Sep 17 08:32:25 mail postfix/smtp[31356]: < mail01.riedelbau.de[93.188.26.3]:25: 250-PIPELINING
    Sep 17 08:32:25 mail postfix/smtp[31356]: < mail01.riedelbau.de[93.188.26.3]:25: 250-DSN
    Sep 17 08:32:25 mail postfix/smtp[31356]: < mail01.riedelbau.de[93.188.26.3]:25: 250-ENHANCEDSTATUSCODES
    Sep 17 08:32:25 mail postfix/smtp[31356]: < mail01.riedelbau.de[93.188.26.3]:25: 250-8bitmime
    Sep 17 08:32:25 mail postfix/smtp[31356]: < mail01.riedelbau.de[93.188.26.3]:25: 250-BINARYMIME
    Sep 17 08:32:25 mail postfix/smtp[31356]: < mail01.riedelbau.de[93.188.26.3]:25: 250-CHUNKING
    Sep 17 08:32:25 mail postfix/smtp[31356]: < mail01.riedelbau.de[93.188.26.3]:25: 250-VRFY
    Sep 17 08:32:25 mail postfix/smtp[31356]: < mail01.riedelbau.de[93.188.26.3]:25: 250-TLS
    Sep 17 08:32:25 mail postfix/smtp[31356]: < mail01.riedelbau.de[93.188.26.3]:25: 250-STARTTLS
    Sep 17 08:32:25 mail postfix/smtp[31356]: < mail01.riedelbau.de[93.188.26.3]:25: 250 OK
    Sep 17 08:32:25 mail postfix/smtp[31356]: server features: 0x901f size 36700160
    Sep 17 08:32:25 mail postfix/smtp[31356]: Using ESMTP PIPELINING, TCP send buffer size is 87040, PIPELINING buffer size is 4096
    Sep 17 08:32:25 mail postfix/smtp[31356]: Host offered STARTTLS: [mail01.riedelbau.de]
    Sep 17 08:32:25 mail postfix/smtp[31356]: smtp_stream_setup: maxtime=300 enable_deadline=0
    Sep 17 08:32:25 mail postfix/smtp[31356]: > mail01.riedelbau.de[93.188.26.3]:25: MAIL FROM: SIZE=676
    Sep 17 08:32:25 mail postfix/smtp[31356]: > mail01.riedelbau.de[93.188.26.3]:25: RCPT TO: ORCPT=rfc822;alex@riedelbau.de
    Sep 17 08:32:25 mail postfix/smtp[31356]: > mail01.riedelbau.de[93.188.26.3]:25: DATA
    Sep 17 08:32:25 mail postfix/smtp[31356]: smtp_stream_setup: maxtime=300 enable_deadline=0
    Sep 17 08:32:25 mail postfix/smtp[31356]: vstream_fflush_some: fd 14 flush 116
    Sep 17 08:32:25 mail postfix/smtp[31356]: vstream_buf_get_ready: fd 14 got 141
    Sep 17 08:32:25 mail postfix/smtp[31356]: < mail01.riedelbau.de[93.188.26.3]:25: 530 5.7.0 Must issue a STARTTLS command first
    

    The error is fixed by running

    postconf -e "smtp_tls_security_level=encrypt"
    systemctl restart postfix
    

    You may also need to check the value of smtpd_tls_CAfile

    root@mail:~# postconf smtpd_tls_CAfile
    smtpd_tls_CAfile = /etc/ssl/certs/ca-certificates.crt
    root@mail:~# 
    

    If you don't have this set, run

    postconf -e "smtpd_tls_CAfile = /etc/ssl/certs/ca-certificates.crt"
    

    See postfix

  • How to install Docker on CentOS 8

    How to install Docker on CentOS 8

    RHEL replaced Docker on RHEL 8 (CentOS 8) with podman. To install Docker on CentOS, you can do the fallowing steps.

    Install yum-utils

    yum install -y yum-utils
    

    Add Docker repository

    yum-config-manager --add-repo https://download.docker.com/linux/centos/docker-ce.repo
    

    Install Docker with

    yum install docker-ce docker-ce-cli containerd.io
    

    Enable docker to start on boot

    systemctl enable docker
    

    Start docker

    systemctl start docker
    

    Check the status of the docker

    systemctl status docker
    

    Back to docker

  • dmidecode

    dmidecode

    dmidecode is a tool for dumping a computer’s DMI (SMBIOS ) table contents in a human-readable format. This table contains a description of the system’s hardware components, as well as other useful pieces of information such as serial numbers and BIOS revision. Thanks to this table, you can retrieve this information without having to probe for the actual hardware. While this is a good point in terms of report speed and safeness, this also makes the presented information possibly unreliable.

    The DMI table doesn’t only describe what the system is currently made of, it also can report the possible evolutions (such as the fastest supported CPU or the maximal amount of memory supported).

    SMBIOS stands for System Management BIOS, while DMI stands for Desktop Management Interface. Both standards are tightly related and developed by the DMTF (Desktop Management Task Force).

    To see system details, run

    dmidecode
    

    How to find RAM details in Linux

  • How to find RAM details in Linux

    How to find RAM details in Linux

    To find RAM memory details (model number/manufacturer) in Linux, you can use the command

    dmidecode --type 17
    

    To show only model numbers, run

    dmidecode --type 17 | grep "Part Number"
    

    Linux find ram details

    Once you find the Part Number, you can search in google for the part number to see more details about the RAM.

    On Ubuntu/Debian, you can install dmidecode with the command

    apt install -y dmidecode
    

    On RHEL, CentOS, OracleLinux, you can use the command

    yum install dmidecode
    

    On newer RHEL systems, you can use dnf instead of yum.

  • How to install LetsEncrypt SSL on Bitnami WordPress Server

    How to install LetsEncrypt SSL on Bitnami WordPress Server

    To install a free LetsEncrypt SSL certificate on bitnami WordPress installation, do the following

    log in to the server as user “bitnami” using SSH/putty.

    Run command

    sudo /opt/bitnami/bncert-tool
    

    It will ask for the domain name. Enter domain names separated by space. After that you will be asked if you need to redirect the domain name to www, select the one you prefer for your website. Then it show a summary of tasks, once you confirm it, SSL will be installed.

    Before you do this, make sure the domain name is pointed to server IP and DNS is propagated.

    For more information, check bitnami documentation.

    See bitnami

  • Uvicorn

    Uvicorn

    Uvicorn is a lightning-fast ASGI server used to serve Python ASGI frameworks like FastAPI, Django Channels, Quart, BlackSheep, etc…

    https://www.uvicorn.org

    To install Uvicorn, run

    pip install uvicorn

    To run, you can use

    uvicorn main:app --host 0.0.0.0 --port 8000 --reload

    See Python

  • Running Apache VirtualHost under separate user with mpm-itk

    Running Apache VirtualHost under separate user with mpm-itk

    mpm-itk allow you to run Apache VirtualHost under a specific user/group instead of under the Apache user/group. On Debian/Ubuntu Apache web server is run under user www-data. When you host multiple websites under an Apache server, running all sites under the same www-data user allows a hacker to access files of other sites if one of the sites is hacked. Having apache VirtualHost run as it own user give user-level isolation for each of your website. This also avoids permission-related errors due to apache running as a different user than the user you use to upload the files.

    mpm-itk is non-threaded, it works file with mod_php. It works very similarly to mod_ruid2, which is removed from the latest Debian due to a security issue.

    On Debian/Ubuntu, you can install it with

    apt install libapache2-mpm-itk
    

    During the installation, the apache module gets enabled by default, you can enable/disable it with command

    a2dismod mpm_itk
    a2enmod mpm_itk
    

    To activate mpm-itk, all you need to do is add the following code to the Apache VirtualHost entry of your website.

    
        AssignUserID USERNAME GROUP


    I normally create a user with the command

    useradd -m --shell /bin/bash --home /home/DOMAIN_NAME USERNAME
    

    Then create a VirtualHost like the following

    vi /etc/apache2/sites-available/DOMAIN_NAME.conf
    

    Add

    
        ServerName DOMAIN_NAME
        ServerAlias www.DOMAIN_NAME
        ServerAdmin info@DOMAIN_NAME
        DocumentRoot /home/DOMAIN_NAME/html
        CustomLog ${APACHE_LOG_DIR}/DOMAIN_NAME.log combined
        ErrorLog ${APACHE_LOG_DIR}/DOMAIN_NAME-error.log
        Header always append X-Frame-Options SAMEORIGIN
        
            AssignUserID USERNAME USERNAME
        
        
            Options All -Indexes
            AllowOverride All
            Require all granted
            Order allow,deny
            allow from all


    Enable VirtialHost with

    a2ensite DOMAIN_NAME
    

    Create website folders

    mkdir /home/DOMAIN_NAME/html/
    chown -R USERNAME:USERNAME /home/DOMAIN_NAME/
    chmod -R 755 /home/DOMAIN_NAME/
    

    Restart Apache webserver

    systemctl restart apache2
    

    Back to Apache

  • How to fix Cpanel Server shared IP address show customer site

    On a Cpanel Server, when you visit a shared IP address used by multiple websites, you will see the website of the first VirtualHost entry. This is not good when you have multiple customer websites as your other customers may visit the IP and see the site associated with the first VirtualHost entry and complain about this. I had customers reporting that their site is hacked when this happened to them.

    The solution is to add a VirtualHost entry for the IP address. So when visitors use IP address, that VirtualHost shows up.

    On Cpanel Server, you can do this by editing

    vi /etc/apache2/conf.d/includes/pre_virtualhost_global.conf
    

    Add content

    
    DocumentRoot /var/www/html


    DocumentRoot /var/www/html
    
    suPHP_UserGroup nobody nobody
    
    
    AllowOverride All
    
    
    SSLEngine on
    
    SSLCertificateFile /var/cpanel/ssl/cpanel/cpanel.pem
    SSLCertificateKeyFile /var/cpanel/ssl/cpanel/cpanel.pem
    SSLCertificateChainFile /var/cpanel/ssl/cpanel/cpanel.pem
    SSLUseStapling Off


    SecRuleEngine On


    In the above code, replace YOUR_SERVER_IP_HERE with your actual server IP address. If you have multiple IP addresses, repeat the code above for each of your IP addresses.

    Now restart Apache

    systemctl restart httpd
    

    See Cpanel Server