Blog

  • How to install ImunifyAV+

    ImunifyAV+ is an anti-malware software for Cpanel/Plesk servers. This is paid version of ImunifyAV.

    To install ImunifyAV+, run

    If you have a key-based license

    wget https://repo.imunify360.cloudlinux.com/defence360/imav-deploy.sh -O imav-deploy.sh
    bash imav-deploy.sh --key YOUR_KEY
    

    If you have an IP-based license for ImunifyAV+, use IPL as the license key

    wget https://repo.imunify360.cloudlinux.com/defence360/imav-deploy.sh -O imav-deploy.sh
    bash imav-deploy.sh --key IPL 
    

    See ImunifyAV

  • How To Add an Additional IP Address in cPanel Server

    How To Add an Additional IP Address in cPanel Server

    Cpanel servers allow you to add multiple IP addresses. Additional IP addresses are useful for running name servers, hosting sites on different IP addresses (many use dedicated IP for SEO), and mail servers. Before you can add additional IP addresses to a server, you need it purchased from your server provider.

    To add an IP address, log in to WHM of your server by going to

    http://your-server-ip/whm
    

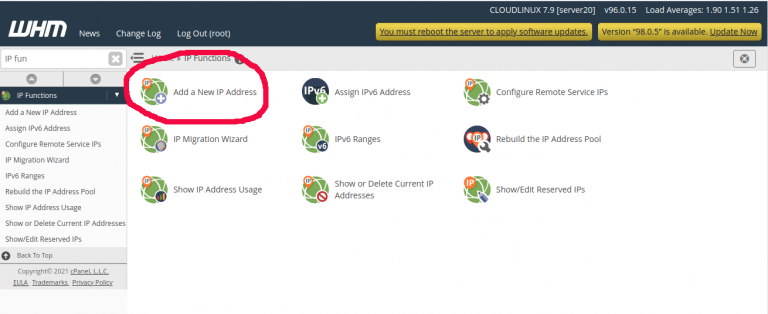
    After login, click on

    IP Functions > Add a New IP Address
    

    WHM IP functions

    On the next page, you will get a form, where you can add the IP address.

    cpanel server add ip

    Enter your IP address in the text box “New IP or IP range to add:”. Then select the netmask from the select box below. Netmask and IP address will be provided by your server hosting provider. Generally, netmask will be 255.255.255.0, some providers recommend you to use 255.255.255.255.

    Click on Submit button to add IP address.

    To verify IP address working properly, you can ping to the IP or visit the IP address in a web browser, you should see the default Cpanel page.

    See Cpanel Server

  • Flask Python framework

    Flask is a Python framework. You can find more info at the official website.

    https://flask.palletsprojects.com/

    How to start a Flask application?

    To start flask application, run

    python app.py
    

    How to run flask application on port 80

    To run flask application on port 80, use command

    flask run --host 0.0.0.0 --port 80
    

    Or edit app.py, use the following code

    if __name__ == '__main__':
        app.run(host='0.0.0.0', port=80)
    

    Or you can use the following environment variables

    FLASK_RUN_HOST=0.0.0.0
    FLASK_RUN_PORT=80
    

    Port 80 can only be used by the root user, so you need to run the above command as root. Only do this for testing as it is insecure to run an application as the root user.

    Default flask app name

    When you run

    flash run
    

    It looks for app.py file. If you need to change the file name, you can use the environment variable

    FLASK_APP=application.py
    

    See python

  • How to redirect a domain with html extension in Nginx

    A WordPress website needs to migrate to a different domain, on a new domain site use static HTML pages. On the source site, WordPress is configured to use URL like https://domain1/page-name/, on the new server, the same page available on URL https://domain2/page-name.html

    Source = https://domain1/page-name/
    Destinatation = https://domain2/page-name.html
    

    To do the redirection, edit Nginx configuration for the website, on top of it (inside server entry), add

    rewrite ^/$ https://new-domain.tld permanent;
    rewrite ^(.*)/$ https://new-domain.tld$1.html permanent;
    rewrite ^(.*)$ https://new-domain.tld$1.html permanent;
    

    Restart Nginx

    systemctl restart nginx
    

    See Nginx Redirect

  • CPanel  SSL Renew on password protected site

    CPanel SSL Renew on password protected site

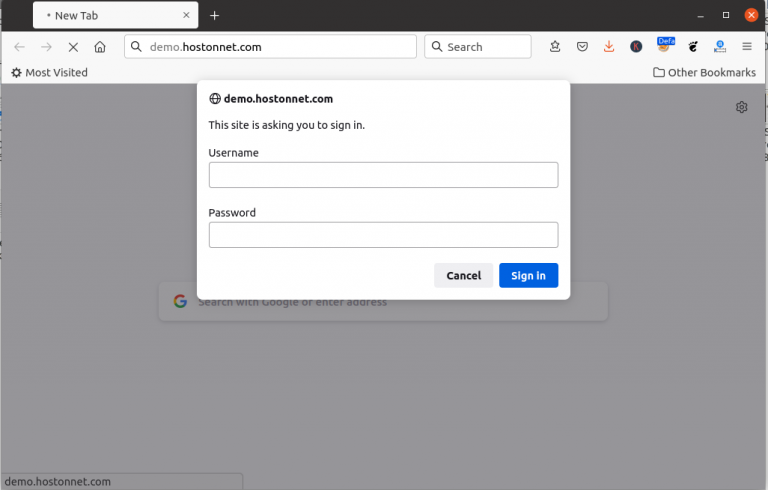
    We have a site where we host demo websites that we do for our customers. We don’t want search engines to index these sites or strangers to see them. So it is password protected. The problem is Cpanel Auto SSL needs to access URI like /.well-known/ for SSL domain validation. With password protection, SSL domain verification fails and you won’t be able to renew the SSL certificate.

    In this post, I am doing it for domain demo.hostonnet.com with Cpanel username hostond.

    cpanel password protected site ssl

    Redirect HTTP to HTTPS

    I want to force all buy SSL verification requests to get redirected to HTTPS. For this, i created a folder

    mkdir -p /etc/apache2/conf.d/userdata/std/2_4/hostond/demo.hostonnet.com/
    

    Now create a file

    vi /etc/apache2/conf.d/userdata/std/2_4/hostond/demo.hostonnet.com/force-ssl.conf
    

    Add following content to it.

    RewriteEngine On 
    RewriteCond %{REQUEST_URI} !^/\.well-known/
    RewriteRule ^/?(.*) https://%{SERVER_NAME}/$1 [R,L]
    

    This will redirect all requests that do not start with URI .well-known to HTTPS.

    Password Protect site

    Since HTTP only allows domain validation (pages inside folder .well-known) and redirects all other requests to HTTPS, we only need to password protect the HTTPS side of the website.

    First, create a directory

    mkdir -p /etc/apache2/conf.d/userdata/ssl/2_4/hostond/demo.hostonnet.com/
    

    Create file

    vi /etc/apache2/conf.d/userdata/ssl/2_4/hostond/demo.hostonnet.com/password.conf
    

    Add following content

    
        AuthType Basic
        AuthName "Restricted Content"
        AuthUserFile /etc/apache2/demo-hon-htpaswd
        Require valid-user


    Setting Password

    HTTP Basic authentication password is stored in file /etc/apache2/demo-hon-htpaswd. To set password, use htpasswd command.

    To create a user, use

    htpasswd -c /etc/apache2/demo-hon-htpaswd admin
    

    This will create a user with the username “admin”. You will be asked to enter a password.

    Now restart apache

    systemctl restart httpd
    

    See Cpanel Server

  • podman

    Podman is a daemonless, open source, Linux native tool designed to make it easy to find, run, build, share and deploy applications using Open Containers Initiative (OCI) Containers and Container Images. It is compatible with docker cli, so you can alias podman to docker.

    To install Podman on Oracle Linux 8, run

    dnf install podman
    

    Once installed, you can search for a container image with the command

    podman search nginx
    

    To run nginx container, use the command

    podman run -d -p 80:80 docker.io/library/nginx
    

    Example

    [root@nginx-proxy ~]# podman run -d -p 80:80 docker.io/library/nginx
    264b06dd3b0a2f2a2823562fd4c5dd3cd7f9a312baf17765df060d4e72e55725
    [root@nginx-proxy ~]#
    
    [root@nginx-proxy ~]# podman ps
    CONTAINER ID  IMAGE                           COMMAND               CREATED             STATUS                 PORTS               NAMES
    264b06dd3b0a  docker.io/library/nginx:latest  nginx -g daemon o...  About a minute ago  Up About a minute ago  0.0.0.0:80->80/tcp  wonderful_heisenberg
    [root@nginx-proxy ~]# podman stop 264b06dd3b0a
    264b06dd3b0a
    [root@nginx-proxy ~]# podman rm 264b06dd3b0a
    264b06dd3b0a2f2a2823562fd4c5dd3cd7f9a312baf17765df060d4e72e55725
    [root@nginx-proxy ~]# 
  • Find expiry date for SSL certificate using openssl

    To find the expiry date of an SSL certificate using openssl command, run

    openssl x509 -noout -dates -in /path/to/domain.crt
    

    Example

    root@ok:~# openssl x509 -noout -dates -in /etc/ssl/serverok.in.crt
    notBefore=Aug 16 22:37:11 2021 GMT
    notAfter=Sep 17 22:37:11 2022 GMT
    root@ok:~# 
    

    notBefore is the start date for the SSL. notAfter is the expiry date for the SSL.

    See OpenSSL

  • acme.sh list all SSL certificates

    acme.sh is an open source bash script that makes it easy to issue free SSL certificates using LetsEcrypt and ZeroSSL.

    To list all SSL certificates, use the command

    acme.sh --list
    

    Example

    Acme.sh list SSL certificates

    If you need to delete an SSL certficate, run command

    acme.sh --remove -d DOMAIN_NAME_HERE
    

    Example

    root@ok:~# acme.sh --remove -d booctep.com
    [Tue 17 Aug 2021 08:25:20 AM UTC] booctep.com is removed, the key and cert files are in /root/.acme.sh/booctep.com
    [Tue 17 Aug 2021 08:25:20 AM UTC] You can remove them by yourself.
    root@ok:~#
    

    See acme.sh

  • Nginx file upload error

    When uploading a file on a PHP Application running under an Nginx web server, I get the following error

    2021/08/14 12:32:04 [crit] 1722576#1722576: *42823 open() "/var/lib/nginx/tmp/client_body/0000000006" failed (13: Permission denied), client: 59.12.21.51, server: team.serverok.in, request: "POST /index.php/ijci/$$$call$$$/wizard/file-upload/file-upload-wizard/upload-file?submissionId=311&stageId=1&fileStage=2&reviewRoundId=&assocType=&assocId= HTTP/2.0", host: "team.serverok.in", referrer: "https://team.serverok.in/index.php/ijci/submission/wizard/2?submissionId=311"
    

    The error was due to wrong ownership for folder /var/lib/nginx/tmp/client_body/ or one of its parent folders.

    On this web server, nginx was running as user nobody, so to fix the error, I run the following command

    chown -R nobody:nobody /var/lib/nginx/
    

    See Nginx

  • MySQL see all charsets

    To see all charsets available on your MySQL installation, run the command

    select * from information_schema.character_sets; 
    

    maxlen column specifies how many bytes are required to store one character.

    MariaDB [(none)]> select maxlen, character_set_name from information_schema.character_sets where character_set_name in('latin1', 'utf8', 'utf8mb4'); 
    +--------+--------------------+
    | maxlen | character_set_name |
    +--------+--------------------+
    |      1 | latin1             |
    |      3 | utf8               |
    |      4 | utf8mb4            |
    +--------+--------------------+
    3 rows in set (0.000 sec)
    
    MariaDB [(none)]> 
    

    latin1 charset uses 1 byte to store a character. uff8mb4 uses 4 bytes to store a character.

    See MySQL

  • How to Enable Magento 2 Cronjob

    Magento uses cron jobs for numerous features to schedule activities. To enable the cron job in Magento 2, log in to the server using SSH. Switch to the appropriate user if you are logged in as root. Now run command

    php bin/magento cron:install
    

    If you need to remove the cronjob, run

    php bin/magento cron:remove
    

    set cronjob in magento 2

    See Magento

  • Cheap Imunify360 license

    Imunify360 is security software for web servers. It supports popular control panels like Cpanel, Plesk, etc…

    Buying Imunify360 from a reseller is cheaper than buying directly. Here are some resellers for Imunify360

    PROVIDER 1 User 30 Users 250 Users Unlimited Users
    imunify360.com (direct) $12 $25 $35 $45
    isplicense.com $7.6 $15.3 $19.4 $28.2
    cplicense.net $7.5 $11.5 $15.5 $19.5
    jonesolutions.com $8 $12 $16 $20